


This topic describes how to create groups of properties using the elements
<PropertyGroup> and
<PropertyTable>. In the XML extension definition
file, you use these two elements to create groups of properties with a given
caption. In this way, it is possible to manage dependencies between properties and
to create worksheet views from a property.
The element
<PropertyGroup>encapsulates a list of child properties under one group.The element
<PropertyTable>encapsulates a list of child properties under one table. Each child property creates a new column in the table. You can control the line number of this table.
These extension AdvancedProperties demonstrates how to use
the elements <PropertyGroup> and
<PropertyTable>.
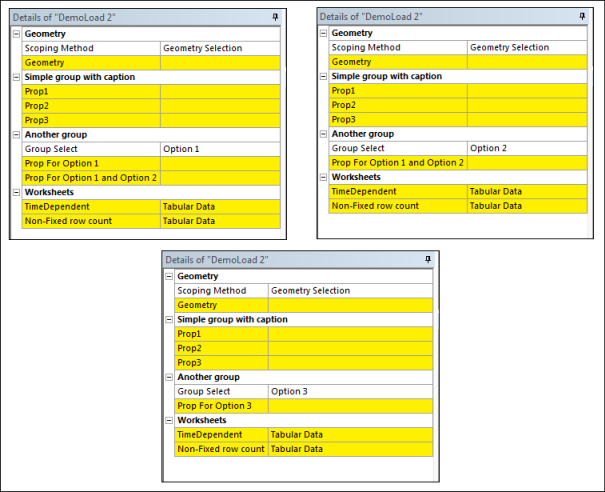
Assume that you want to create a group of properties with a caption and that you want to be able to collapse and expand this group. The following figure shows the caption Simple group with caption.

This group is created with the following XML code:
<propertygroup name="Group1" caption="Simple group with caption" display="caption">
  <property name="Prop1" caption="Prop1" control="text" />
  <property name="Prop2" caption="Prop2" control="text" />
  <property name="Prop3" caption="Prop3" control="text" />
</propertygroup>
The element propertygroup has a special attribute,
display. In this case, display is
set to caption, which indicates that all child properties are
to display under the caption. If caption is omitted,
display defaults to hidden, which
indicates that the property group is hidden.
Assume now that you want to show or hide properties according to the value of another selected property. In the following figure, the visibility of the properties depends on the value of the property Group Select.
This group is created with the following XML code:
<propertygroup name="Group2" caption="Another group" display="caption">
  <propertygroup name="Group3" caption="Group Select" display="property" control="select" default="Option 1">
    <attributes options="Option 1,Option 2,Option 3" />
    <property name="Prop1" caption="Prop For Option 1" visibleon="Option 1" control="text" />
    <property name="Prop2" caption="Prop For Option 1 and Option 2"
     visibleon="Option 1|Option 2" control="text" />
    <property name="Prop3" caption="Prop For Option 3" visibleon="Option 3" control="text" />
  </propertygroup>
</propertygroup>
In this case, the attribute display is set to
property. The element
propertygroup named Group3 defines
a standard ACT property that provides additional capabilities for all child
properties.
Each child property can specify an attribute visibleon,
which can take a value or a set of values. If the current value of the parent
property fits with the attribute visibleon, the property is
displayed. Otherwise, the property is hidden.
You can also create properties that open a worksheet in which to access the
content for properties. You use the type PropertyTable if you
want to create a worksheet that exposes a set of properties for your customization.
To facilitate development, ACT provides two different types of predefined worksheets:
Time-dependent
Non-fixed row dimension
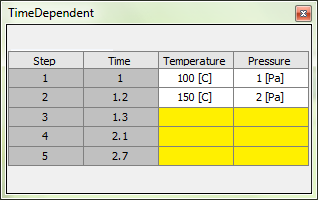
Time-Dependent Worksheets
In a time-dependent worksheet, the row number is initialized with the number of
steps defined in the object AnalysisSettings. When time steps
are added to or removed from the object AnalysisSettings, the
worksheet is automatically updated. Consequently,this type of worksheet represents
an efficient way to manage time-dependent data within an extension.
The following XML code creates a time-dependent worksheet:
<propertytable name="TimeDep" caption="TimeDependent" display="worksheet" control="applycancel" class="Worksheet.TimeFreqTabularData.TFTabularData">
  <property name="Step" caption="Step" control="integer" readonly="true" />
  <property name="Time" caption="Time" control="float" readonly="true" />
  <property name="Temperature" caption="Temperature" unit="Temperature" control="float"></property>
  <property name="Pressure" caption="Pressure" unit="Pressure" control="float"></property>
</propertytable>
In this example, the attribute display is set to
worksheet. In addition, the attribute
class specifies the name of the IronPython class that
manages the worksheet. This example uses the class
TFTabularData, which is defined in the function library
TimeFreqTabularData.py. This library is installed with ACT and
located in
%ANSYSversion_DIR%\Addins\ACT\libraries\Mechanical\Worksheet.
The properties Step and Time
integrate a specific treatment, as they are automatically populated with the
information specified in the object AnalysisSettings. These
two properties are optional.
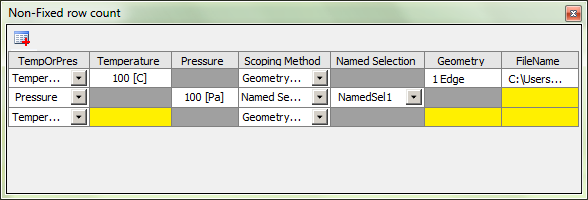
Non-Fixed Row Dimension Worksheets
In a non-fixed row dimension worksheet, the array is empty by default. You can add a new line by clicking the top left button.
The following XML code creates a non-fixed row dimension worksheet:
<propertytable name="Worksheet" caption="Non-Fixed row count" display="worksheet" control="applycancel" class="Worksheet.PropertyGroupEditor.PGEditor">
  <propertygroup name="TempOrPres" caption="TempOrPres" display="property" control="select" default="Temperature">
    <attributes options="Temperature,Pressure" />
    <property name="Temperature" caption="Temperature" unit="Temperature" control="float"
     visibleon="Temperature"></property>
    <property name="Pressure" caption="Pressure" unit="Pressure" control="float" visibleon="Pressure"></property>
  </propertygroup>

  <property name="Scoping" caption="Scoping" control="scoping">
    <attributes selection_filter="face|edge" />
  </property>
  <property name="FileName" caption="FileName" control="fileopen">
    <attributes filters="Command files (*.bat)|*.bat|All files (*.*)|*.*" />
  </property>
</propertytable>
This example uses the class PGEditor, which is defined in
the function library PropertyGroupEditor.py. This library is installed with ACT and
located in
%ANSYSversion_DIR%\Addins\ACT\libraries\Mechanical\Worksheet.
You access the content of the worksheet in the same manner as you do any other standard ACT property.