


Ray Aiming
Ray Aiming is available in Sequential mode only.
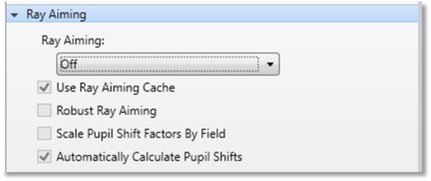
These Ray Aiming features are available in the System Explorer. The controls define the ray aiming algorithm.
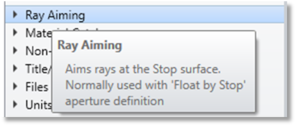
Ray Aiming:
Ray aiming is an iterative ray tracing algorithm in OpticStudio that finds rays at the object that correctly fill the stop surface for a given stop size. It is generally only required when the pupil, which is the image of the stop as seen from object space, is considerably aberrated, shifted, or tilted.
Ray Aiming Off
If ray aiming is off, OpticStudio will use the paraxial entrance pupil size and location determined by the aperture settings and calculated at the primary wavelength on axis for launching rays from the object surface. This means OpticStudio will ignore entrance pupil aberration. For slow systems with modest field angles, this is perfectly acceptable. However, certain systems, such as those with low F/#'s or large field angles, may have significant entrance pupil aberration. The two primary effects of pupil aberration are the shift in location of the pupil with field angle, and the anamorphic scaling of the edges of the pupil.
OpticStudio can be instructed to account for aberrations of the pupil using ray aiming. With ray aiming, every ray trace is performed iteratively, with the program adjusting the ray coordinates or cosines in object space so that the ray crosses the correct location on the stop surface. To determine the correct location on the stop surface, the stop surface radius must be computed. The stop surface radius is computed by tracing a marginal ray from the center of the object to the stop surface at the primary wavelength. Either paraxial or real rays may be used in this trace to determine the stop radius.
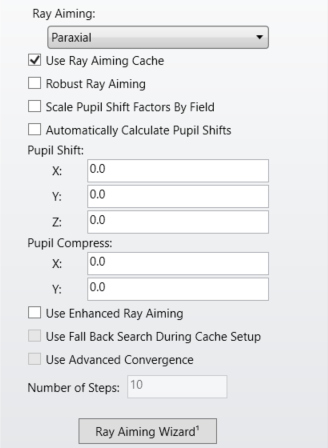
Paraxial Ray Aiming
Paraxial rays are well behaved and paraxial definitions are commonly used for most first-order system properties such as focal length, F/#, and magnification, and so paraxial rays may also be used to determine the stop size. However, for systems that have significantly aberrated pupils, there will be a difference between the paraxial and real ray stop radius. These systems will exhibit a difference between the real and paraxial ray system aperture. For example, the paraxial object space numerical aperture may be defined as 0.4, but the actual numerical aperture of real rays may be a different value.
Real Ray Aiming
For real rays to have the object space properties defined by the system aperture, use real rays instead of paraxial rays to determine the stop radius. Note that real ray based ray aiming will not work in systems where the stop lies in a caustic or where the real rays cannot be traced at the full entrance pupil diameter or numerical aperture. If real ray aiming causes any of these problems, set the ray aiming to paraxial rather than real. Also, if real rays undergo TIR or are otherwise unable to trace to the stop, OpticStudio will use paraxial rays to determine the stop radius, and a warning to this effect will be included in the System Check Report. Note that once the stop radius is determined all rays are aimed to the correct location on the stop, regardless of whether paraxial or real rays were used to determine the stop radius.
Although real ray aiming is more accurate than paraxial entrance pupil aiming, most ray traces will take from two to eight times as long to perform. Therefore, real ray aiming should only be used when required, and when paraxial ray aiming does not account for the majority of pupil aberrations.
To determine the amount of entrance pupil aberration in your system, select ray aiming off, and then look at the pupil aberration plot. Pupil aberration of less than a few percent is generally insignificant. If your system has significant pupil aberration, turn paraxial ray aiming on, and look at the pupil aberration plot again. If there is still significant pupil aberration with paraxial ray aiming, then change to the real ray aiming algorithm. The aberration will decrease to zero, or very nearly so. Note that ray aiming does not, of course, actually eliminate pupil aberration, it merely accounts for it.
To eliminate any ambiguity in the calculation of the actual stop size, set ray aiming to paraxial or real, and then set the system aperture type to "float by stop size". This eliminates the need for any ray tracing at all to determine the stop size, and both real and paraxial rays will be aimed to the real stop exactly.
For systems with virtual stops, such as some eyepieces, the effective stop location and size may be a function of wavelength. For these systems, use the multi-configuration capability to treat each wavelength and system aperture definition separately.
Use Ray Aiming Cache:
If checked, OpticStudio caches ray aiming coordinates so that new ray traces take advantage of previous iterations of the ray tracing algorithm. Using the cache can speed up ray tracing dramatically. However, use of the cache does require that the chief ray can be traced accurately. For some systems, the chief ray cannot be traced, and for these systems, the cache should be turned off. If Robust Ray Aiming is checked, then Use Ray Aiming Cache is forced into effect.
Robust Ray Aiming (slow):
If checked, OpticStudio uses a more reliable, but slower algorithm for aiming rays. This switch should only be set if the ray aiming algorithm is failing even with the cache turned on. This switch has no effect unless the ray aiming cache is checked on. Robust mode goes through an additional check to make sure that if multiple ray paths to the same stop surface location exist, only the correct one is chosen. This is typically a problem in very fast, very wide angle systems where off axis fields may find a virtual path to the stop that confuses the ray aiming iteration.
Pupil Shift:
For some very wide angle or highly tilted or decentered systems, the ray aiming feature will fail if unassisted. The problem is that the paraxial entrance pupil is used as a first guess to trace the ray. If the pupil aberration is severe, it is possible that even this first guess cannot be traced, which prevents the algorithm from taking a second, more refined guess.
The solution is to provide a rough guess as to how much the pupil has been shifted and compressed with respect to the paraxial pupil. There are three shift components; x, y, and z; all measured in lens units. There are two compress components; x and y, and these are dimensionless scaling factors. The default value of zero for all five may be modified to assist the algorithm in finding a successful first guess for the ray aiming.
The shifts move the center of the aim point on the paraxial entrance pupil. Positive values for the z shift indicate that the aim point is to the right of the paraxial pupil, negative values indicate the pupil is shifted to the left. Most wide angle systems have left-shifted pupils. The z pupil shift value provided is scaled linearly with the field angle of the ray being traced, so the pupil shift refers to the offset of the pupil at full field. All shifts are in lens units.
Automatically Calculate Pupil Shifts:
When selected, OpticStudio will automatically calculate the difference in location between the real and paraxial entrance pupils in order to determine the value for the pupil shift factors. When ray aiming is on, "Automatically calculate pupil shifts" will be checked by default. If unchecked, the X-, Y- and Z-Pupil shifts will need to be manually set.
If the stop is to the left of the object, the automatic calculation won't give accurate information, and the automatically calculated shifts are set to zero. The user will need to set the pupil shifts himself.
Scale pupil shift factors by field:
If selected, the x and y pupil shift values are also scaled with field, otherwise, the x and y shift values are used for all fields without any scaling. All shifts are in lens units.
Pupil Compress:
The x and y compress values are used to change the relative coordinates on the paraxial entrance pupil to start the iteration. A value of zero means no compress, while a value of 0.1 indicates the pupil is compressed 10%. The compress values are particularly useful when the real pupil is smaller than the paraxial pupil, and rays traced at the full paraxial pupil size are difficult or impossible to trace.
It is important to understand that the exact values of the pupil shift and compress values is unimportant. Once the first guess ray can be traced, the algorithm will robustly find the exact pupil location. The pupil shift and compress values are just to get the ray aiming started. Neither the shift nor the compress values actually change the size of the entrance pupil. Generally, guessing at the pupil shift and compress values is an acceptable way of determining a suitable value.
Use Enhanced Ray Aiming:
If selected, the Enhanced Ray Aiming algorithm is used, this is designed to be more stable and faster for systems where the standard or Robust ray aiming algorithms can struggle, in particular wide field-of-view systems.
The Enhanced Ray Aiming algorithm is designed to be used for the following types of systems:
- Off-axis ray must be traceable through the system.
- Aperture must be Float By Stop Size, Entrance Pupil Diameter or Image Space F/#.
- The system must be one of following types:
- Finite and Infinite Conjugate with Field Type set to Angle.
- Finite and Infinite Conjugate with Field Type set to Theodolite Angle.
- Finite Conjugate with Field Type set to Object Height and Ray Angles are less than 90°.
Use Fall Back Search During Cache Setup:
This option can be used to improve the Enhanced Ray Aiming for certain off axis or aspherical systems where the Enhanced Ray Algorithm performs less well. It is recommended to leave this option unchecked unless there are problems in ray aiming.
Use Advanced Convergence:
This option can be used to improve the Enhanced Ray Aiming algorithm for systems substantial rotations around the z-axis although it may improve ray tracing in other types of systems. It is recommended to leave this option unchecked unless there are ray aiming issues.
Number of Steps:
Choose the number of steps used during the Cache Setup for Enhanced Ray Aiming. It is recommended to use the default value (10) however a higher number of steps can improve stability but will reduce speed of the ray aiming calculations.
Ray Aiming Wizard:
See Ray Aiming Wizard.
Troubleshooting:
Occasionally there will be cases where it can be observed that ray bundles do not fill the stop surface or errors messages such as "Cannot Determine Object Coordinate" and "Cannot find rays to yield requested image height" are displayed. Usually turning on ray aiming will solve this error message. If, when ray aiming is turned on, the initial first guess ray cannot be traced then the fall back option is to search over a grid of rays. That grid of rays needs a scale to set the distance between grid points, and that scale is set by the first surface with optical power.
If the semi-diameter of that surface is zero, then we cap the search scale based on the radius of that surface or the entrance pupil diameter depending on which is smaller. Note this is mainly for a cautious check as it's unusual to have a surface with optical power and zero semi-diameter at the same time.
If the semi-diameter of that surface is non-zero, then we cap the search scale based on the radius and a multiple of the semi-diameter value depending on which is smaller.
The ray aiming search can be aided by applying a fixed semi-diameter solve to the first surface with optical power. This will narrow down the search and will help the ray aiming algorithm converge more quickly. Even in cases where no error messages are generated, applying a Fixed solve to the Clear Semi-Diameter of the first surface with optical power can significantly increase the update speed of the system.
Next: