In order to enable Windchill and Creo to store and share the data required by the MI
Materials Gateways for Creo and Windchill, the new global attributes must be added to the
data types in Windchill.
If you have an existing MI Materials Gateway implementation, you may have already
configured some or all of these global attributes.
However, if you are configuring Gateway to support synchronization of body assignments
for the first time, you must ensure that you extend your existing data model to
support Granta assignments on bodies.
-
Add new attributes to the CAD Document type
-
In the Site (or Organisation) Type and Attribute
Management utility, click Manage
Types.
-
Navigate to and edit the CAD Document via the Actions menu.
-
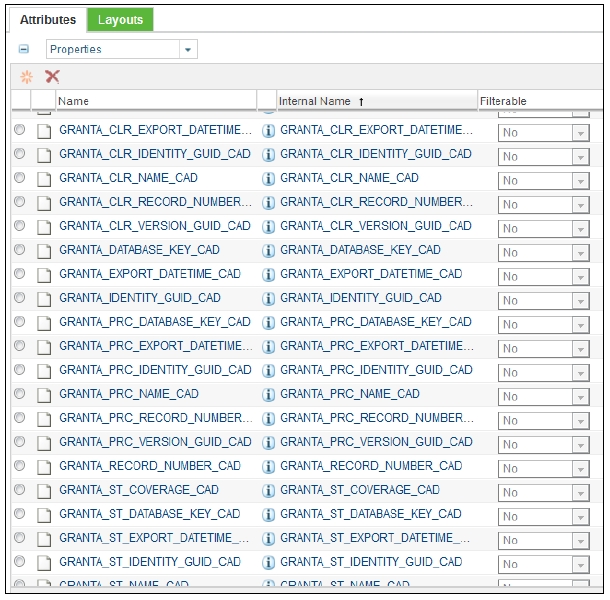
Add the following attributes to the CAD Document, of type Global, and
mapped to the Globally-defined attributes:
GRANTA_DATABASE_KEY_CAD
GRANTA_EXPORT_DATETIME_CAD
GRANTA_IDENTITY_GUID_CAD
GRANTA_TXT_MTL_NAME_CAD
GRANTA_VERSION_GUID_CAD
GRANTA_RECORD_NUMBER_CAD
GRANTA_PRC_DATABASE_KEY_CAD
GRANTA_PRC_EXPORT_DATETIME_CAD
GRANTA_PRC_IDENTITY_GUID_CAD
GRANTA_PRC_NAME_CAD
GRANTA_PRC_VERSION_GUID_CAD
GRANTA_PRC_RECORD_NUMBER_CAD
GRANTA_ST_COVERAGE_CAD
GRANTA_ST_DATABASE_KEY_CAD
GRANTA_ST_EXPORT_DATETIME_CAD
GRANTA_ST_IDENTITY_GUID_CAD
GRANTA_ST_NAME_CAD
GRANTA_ST_VERSION_GUID_CAD
GRANTA_ST_RECORD_NUMBER_CAD
GRANTA_CLR_DATABASE_KEY_CAD
GRANTA_CLR_EXPORT_DATETIME_CAD
GRANTA_CLR_IDENTITY_GUID_CAD
GRANTA_CLR_NAME_CAD
GRANTA_CLR_VERSION_GUID_CAD
GRANTA_CLR_RECORD_NUMBER_CAD
PRO_MP_AREA
PRO_MP_VOLUME
You should now see attributes on the CAD Document as follows:
- Optional:
Define the appearance of attributes on the CAD Document layout.
The new attributes for the CAD Document will be automatically added to the
More Attributes section for that document definition.
This may be modified if desired, or they may be removed. A suggestion is to
leave visible only these attributes:
GRANTA_TXT_MTL_NAME_CAD
GRANTA_PRC_NAME_CAD
GRANTA_ST_NAME_CAD
GRANTA_CLR_NAME_CAD
Note: Any objects that are derived from CAD Document will have inherited its
layouts, and must be amended in the same way. For example, ECAD Document is
derived from CAD Document and therefore the new attributes must be removed
from any layouts in which they appear, if they are not required.
-
Add the attributes to the Part type:
-
In the Site (or Organization) Type and Attribute Management utility,
click Manage Types.
-
Add the following attributes to the Part, of type Global, and mapped to
the Globally-defined attributes created above:
GRANTA_DATABASE_KEY_CAD
GRANTA_DATABASE_KEY_PLM
GRANTA_EXPORT_DATETIME_CAD
GRANTA_EXPORT_DATETIME_PLM
GRANTA_IDENTITY_GUID_CAD
GRANTA_IDENTITY_GUID_PLM
GRANTA_TXT_MTL_NAME_CAD
GRANTA_TXT_MTL_NAME_PLM
GRANTA_VERSION_GUID_CAD
GRANTA_VERSION_GUID_PLM
GRANTA_PRC_DATABASE_KEY_CAD
GRANTA_PRC_DATABASE_KEY_PLM
GRANTA_PRC_EXPORT_DATETIME_CAD
GRANTA_PRC_EXPORT_DATETIME_PLM
GRANTA_PRC_IDENTITY_GUID_CAD
GRANTA_PRC_IDENTITY_GUID_PLM
GRANTA_PRC_NAME_CAD
GRANTA_PRC_NAME_PLM
GRANTA_PRC_VERSION_GUID_CAD
GRANTA_PRC_VERSION_GUID_PLM
GRANTA_ST_COVERAGE_CAD
GRANTA_ST_COVERAGE_PLM
GRANTA_ST_DATABASE_KEY_CAD
GRANTA_ST_DATABASE_KEY_PLM
GRANTA_ST_EXPORT_DATETIME_CAD
GRANTA_ST_EXPORT_DATETIME_PLM
GRANTA_ST_IDENTITY_GUID_CAD
GRANTA_ST_IDENTITY_GUID_PLM
GRANTA_ST_NAME_CAD
GRANTA_ST_NAME_PLM
GRANTA_ST_VERSION_GUID_CAD
GRANTA_ST_VERSION_GUID_PLM
GRANTA_CLR_DATABASE_KEY_CAD
GRANTA_CLR_DATABASE_KEY_PLM
GRANTA_CLR_EXPORT_DATETIME_CAD
GRANTA_CLR_EXPORT_DATETIME_PLM
GRANTA_CLR_IDENTITY_GUID_CAD
GRANTA_CLR_IDENTITY_GUID_PLM
GRANTA_CLR_NAME_CAD
GRANTA_CLR_NAME_PLM
GRANTA_CLR_VERSION_GUID_CAD
GRANTA_CLR_VERSION_GUID_PLM
PRO_MP_AREA
PRO_MP_VOLUME
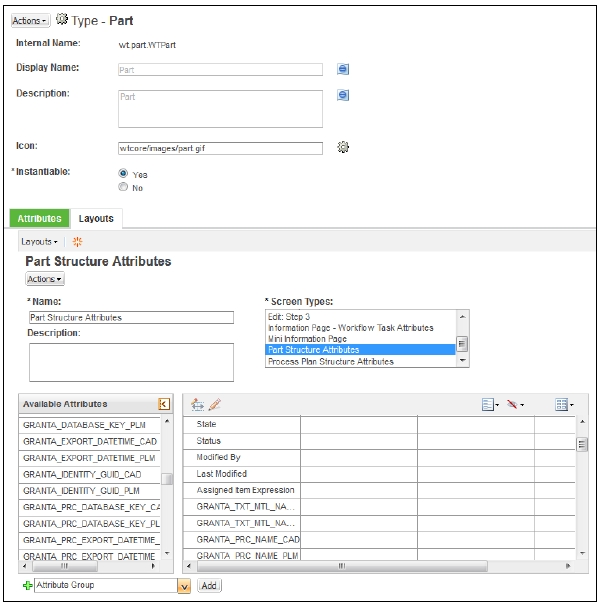
- Optional:
Set the appearance of attributes on the Part layout.
The all attributes will be added to the Part Structure Attributes layout
for that object's definition. You can change which attributes are displayed. You
should ensure that the following attributes are
displayed:
GRANTA_TXT_MTL_NAME_CAD
GRANTA_PRC_NAME_CAD
GRANTA_ST_NAME_CAD
GRANTA_CLR_NAME_CAD
GRANTA_TXT_MTL_NAME_PLM
GRANTA_PRC_NAME_PLM
GRANTA_ST_NAME_PLM
GRANTA_CLR_NAME_PLM
For example:
Note: Any objects that are derived from
Part will have inherited its layouts, and must be amended in the same way. For
example, Electrical Part is derived from Part, and therefore the new attributes
must be removed from any layouts in which they appear here too.
-
Add attributes to the Body type:
-
In the Site (or Organization) Type and Attribute Management utility,
click Manage Types.
-
Navigate to and edit the Body via
Actions.
-
Add the following attributes to the Body, of type Global, and mapped to
the Globally-defined attributes of the same name.
GRANTA_DATABASE_KEY_CAD
GRANTA_DATABASE_KEY_PLM
GRANTA_EXPORT_DATETIME_CAD
GRANTA_EXPORT_DATETIME_PLM
GRANTA_IDENTITY_GUID_CAD
GRANTA_IDENTITY_GUID_PLM
GRANTA_TXT_MTL_NAME_CAD
GRANTA_TXT_MTL_NAME_PLM
GRANTA_VERSION_GUID_CAD
GRANTA_VERSION_GUID_PLM
GRANTA_PRC_DATABASE_KEY_CAD
GRANTA_PRC_DATABASE_KEY_PLM
GRANTA_PRC_EXPORT_DATETIME_CAD
GRANTA_PRC_EXPORT_DATETIME_PLM
GRANTA_PRC_IDENTITY_GUID_CAD
GRANTA_PRC_IDENTITY_GUID_PLM
GRANTA_PRC_NAME_CAD
GRANTA_PRC_NAME_PLM
GRANTA_PRC_VERSION_GUID_CAD
GRANTA_PRC_VERSION_GUID_PLM
GRANTA_ST_COVERAGE_CAD
GRANTA_ST_COVERAGE_PLM
GRANTA_ST_DATABASE_KEY_CAD
GRANTA_ST_DATABASE_KEY_PLM
GRANTA_ST_EXPORT_DATETIME_CAD
GRANTA_ST_EXPORT_DATETIME_PLM
GRANTA_ST_IDENTITY_GUID_CAD
GRANTA_ST_IDENTITY_GUID_PLM
GRANTA_ST_NAME_CAD
GRANTA_ST_NAME_PLM
GRANTA_ST_VERSION_GUID_CAD
GRANTA_ST_VERSION_GUID_PLM
GRANTA_CLR_DATABASE_KEY_CAD
GRANTA_CLR_DATABASE_KEY_PLM
GRANTA_CLR_EXPORT_DATETIME_CAD
GRANTA_CLR_EXPORT_DATETIME_PLM
GRANTA_CLR_IDENTITY_GUID_CAD
GRANTA_CLR_IDENTITY_GUID_PLM
GRANTA_CLR_NAME_CAD
GRANTA_CLR_NAME_PLM
GRANTA_CLR_VERSION_GUID_CAD
GRANTA_CLR_VERSION_GUID_PLM
PRO_MP_AREA
PRO_MP_VOLUME
-
Add attributes to the Assignment link type:
-
In the Site (or Organization) Type and Attribute Management utility,
click Manage Types.
-
Add the following attributes to the link type, of type Global mapped to the specified global
attributes:


