
Rotating or Spinning the View
You can rotate the view relative to the Model Center, the Screen Center, the Current Axis (that is, the active coordinate system origin), or the Cursor location. You can activate the rotation modes via the menu bar, ribbon tabs, or shortcut menu. When a Rotation command is active, you can click and drag using the left mouse button to manipulate the model viewpoint.
Rotation Using Only the Mouse: You can use the middle mouse button to rotate the view without selecting a Rotation command. From the menu bar, click View > Options to access the General tab of the 3D UI Options dialog box. Here, you can choose the desired Default Rotation About option. The view rotates about the Screen Center by default. The other available options are rotation about the Model Center, Current Axis (active coordinate system origin), or Cursor location. This setting also controls the rotation center for the Spin command.
For each active Rotation command, or when using the middle mouse button, the behavior differs depending on where you click and drag, as follows:
- Click and drag the cursor near any border of the Modeler window's display area:
- Click and drag the cursor within the interior of the display area (not close to a border):
- Constrained rotation about the X, Y, or Z axis:
- X + click and drag to rotate the view orientation about the active X axis.
- Y + click and drag to rotate the view orientation about the active Y axis.
- Z + click and drag to rotate the view orientation about the active Z axis.
The view is constrained to rotate about an axis that is perpendicular to the screen. The location of the axis, which is the rotation center line, depends on the active rotation mode (Current Axis, Model Center, Screen Center, or Cursor) or, when no command is active, the Default Rotation About option previously described.
In this case, the view rotates freely about any axis, depending on the direction you drag and the relative positions of the cursor and center of rotation. The rotation center depends on the active rotation mode (Current Axis, Model Center, Screen Center, or Cursor) or, when no command is active, the Default Rotation About option previously described.
Use the following hotkeys to constrain rotation of the model viewpoint to be about a coordinate system axis (global or user-defined). These hotkeys work whether you perform the rotation using the middle mouse button, any of the Rotate commands available on the ribbon (under the View, Draw, or Model tabs), or any of the Rotate commands in the menu bar (View > Interactions > ...).
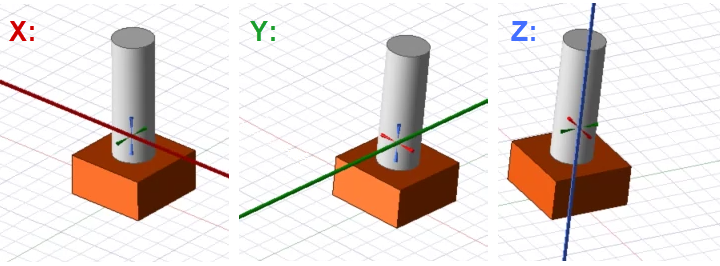
During constrained rotation, a heavy red (X), green (Y), or blue (Z) axis line appears in the Modeler window to provide a clear visual indication of the axis of rotation. These axes pass through the center of rotation, and this center is marked by crosshairs. When using the middle mouse button, the center of rotation is the center point of the drawing canvas. For menu and ribbon commands, you can choose alternative rotation center points (model center, cursor location, or origin), which are covered further down in this help topic. The following image shows the appearance of the rotation axes and center markers:
If rotation response is slow, especially for complex models:
- For some graphics cards, you can improve the performance by setting NVIDIA Control Panel > 3D Settings > Manage 3D Settings > Global Settings > Global Presets: Workstation App - Dynamic Streaming.
For more information about graphics cards, navigate to the appropriate Windows or Linux Ansys Installation Guide and search for OpenGL.