
Transient Analysis Setup from the Schematic Editor
From the Schematic Editor, perform the following steps to set up and run a Nexxim transient analysis:
- From the Project Manager window, expand the Project Tree and [active design folder]. Then right-click Analysis and select Add Nexxim Solution Setup ... > Transient Analysis to open the Transient Analysis window.
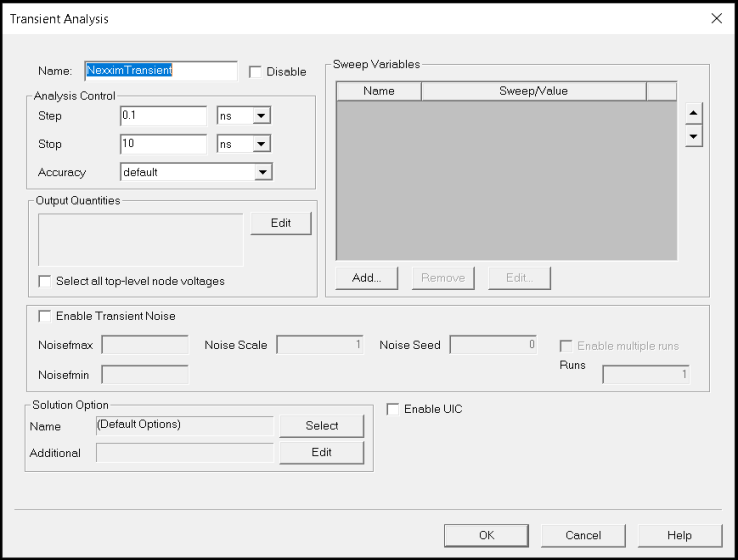
- Type an Analysis Name (or accept the default name, “NexximTransient”).
- For most simulations, leave the Disable group box unselected (the default setting). Selecting this box lets you store multiple solution setups for later use. (Note that if a solution setup is deactivated before the analysis is run, any changes made to the design invalidates the simulation results.)
- Under Analysis Control, specify the Step time, the Stop time, and the Accuracy level using the drop-down menu.
- To add a sweep, locate the Sweep Variable area in the Transient Analysis window.
- From the Sweep Variable area, select Add to open the Add/Edit Sweep window.
- In the Variable list, select Temp or the name of a variable (when a variable has been defined for the design), then select one of the following: Single value, Linear step, Linear count, Decade count, or Octave count.
- Type the sweep values into the Value text box (for Single value), or into the Start, Stop, and Step text fields (for Linear, Decade, or Octave count), and ensure that the appropriate units are selected for each.
- For details on sweeps, see Variable Sweep.
- Click Add, then click OK to close the Add/Edit Sweep window and reopen the Transient Analysis window.
- Optionally, click Edit in the Output Quantities group box to open the Output window.
- Click the check boxes on the Output window to add net voltages and branch currents to the data generated by the transient analysis.
- Click OK to add the selected output values and return to the Transient Analysis window.
-
The Select all top level node voltages checkbox is a short cut to automatically save node voltage output quantities for all schematic nets which aren't being saved otherwise.
Caution -For larger designs this could result in large solution data files and an increase in total simulation time.
- Optionally, click the Enable Transient Noise group box to activate the fields in the transient noise group box. Refer to the Transient Noise topic in the Transient Analysis Netlist Syntax for details on these fields.
- Optionally, use the fields in the Solution Options group box to select or add Transient or DC analysis options and other Nexxim options to the design.
- Click Select on the Name field to open the Select Solution Options window.
- Check the Enable UIC checkbox to enable UIC.
If any options sets have been defined, their names appear in the Select Solution Options group box. To select a named option set that you have previously defined, click the name of the option set, then click OK to return to the Transient Analysis window. The named option set appears in the Name field in the Solution Options group box.
To create a new option set, click New to open the Solution Options window. Click the Name field to name the new option set. Select the DC Options or Transient Options tab. Make the appropriate changes to option values, then click OK to return to the Select Solutions window. From the Select Solutions window, click the name of the new option settings, then click OK to return to the Transient Analysis window. The name of the new option settings appears in the Name field in the Solution Options group box.
- Click Edit on the Additional field to open a text-entry window, Edit additional options.
Use the field to enter any Nexxim options exactly as they are to appear in the netlist. Do not include the keyword .OPTIONS; the .OPTIONS keyword is automatically inserted at the beginning of the line in the netlist statement.
The line can contain multiple options settings. Use spaces to separate the options settings.
To modify or delete an option once it has been added, just edit or delete its entry in the list.
To clear all options, delete the entire line.
Click OK to return to the Transient Analysis window.
The options in the Additional field are automatically added to the netlist when the solution containing them is performed.
- For more information, see Transient Analysis Options.
- Run the simulation:
- From the Circuit menu, select Analyze. If the circuit is set up correctly, the analysis begins immediately and a progress bar appears.
- The Message Manager window signals success or failure.