
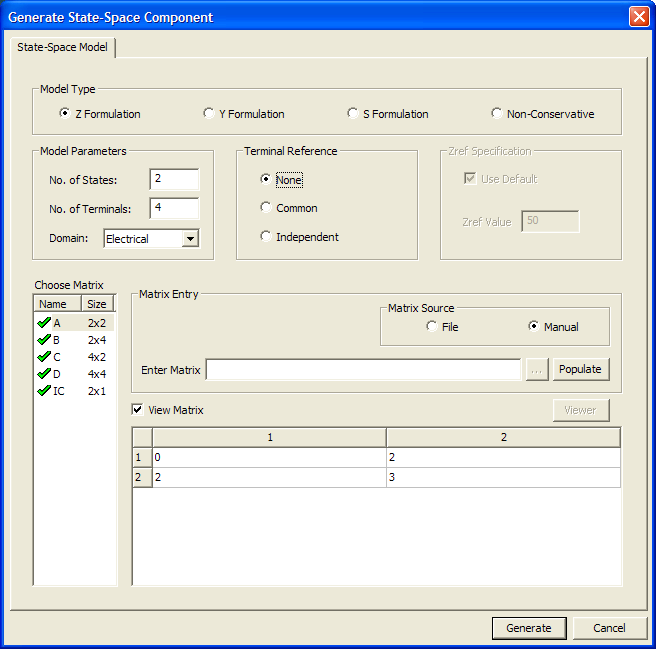
Generate State-Space Component Dialog Box
Use the Generate State-Space Component dialog box to define the parameters needed to generate a state-space component.
Model Type Panel
The state-space component supports both Conservative and Non-Conservative models.
- Conservative
models have bi-directional terminals where the number of inputs equals
the number of outputs. The state-space component currently supports three
matrix forms:
- Z Formulation
- Y Formulation
S Formulation
The S Formulation requires specification of a Zref Value for each port. A default value of 50 ohms can be used, or you can specify values independently for each port via the matrix list.
- Non-Conservative models have separate, non-conservative input and output terminals.
Model Parameters Panel
For Conservative models, you can specify the number of states, number of terminals, and the domain (that is, the nature) of the terminals. For Non-Conservative models, you can specify the number of states, number of inputs, and number of outputs. The values you specify determine the sizes of the state-space matrices in the matrix list.
Terminal Reference Panel
In a physical system each terminal may be assigned a reference port with respect to which the measurement of physical quantities is performed. The state-space model implementation provides the following choices for Conservative models:
- None – No reference port is added to the model.
- Common – One common reference port is added to the model.
- Independent – Each terminal has its own separate reference port added to the model.
Choose Matrix List
This list contains all the matrices whose values need to be specified to generate the model. You must specify at least the A, B, and C matrices to enable the Generate button for component generation. Check marks next to each matrix name indicate if the matrix has been populated or accepted. Sizes of matrices are calculated based on the model parameters. After you select a matrix in the list, use the Matrix Entry fields to specify the matrix source and to populate it. When you select the View Matrix check box, a spreadsheet-style table lets you view and edit the matrix entries.
Matrix Entry Group Panel
Use the settings in the Matrix Entry group to specify a correctly-sized matrix as a list of floating point values. All values must be specified. For example, a 3X3 matrix should have nine values in row-major format.
Matrix Source - either of two matrix sources can be chosen:
- Manual – Enter matrix data manually in the Enter Matrix field.
- File – Import the matrix data with a text file.
Matrix data must be entered in row-major order separated by any of the following delimiters: space, comma, or semicolon. In text files, you can also use newline characters to break the entry at the end of each row.
Click Populate or directly edit the matrix in the table to populate the matrices. Attempting to populate the matrix with incorrectly sized or formatted data generates an error message: “Size of input does not match matrix size”.
By default, the View Matrix box is selected. The selected matrix data can be viewed and edited directly in the matrix table. When View Matrix is cleared, the Viewer button is enabled and can be used to view the matrix data in a text editor such as Notepad.