
Changing Port Properties and Reducing Matrix Size
You can edit the normalization impedance, termination, port order, gamma values, and de-embedding distance with the Port Properties dialog box.
To access these options, click Edit Ports  on the NDE tab. The Ports Properties dialog box opens.
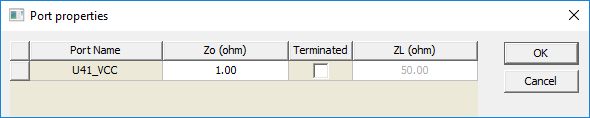
Ports appear in a table. Click a column heading to sort by that column. Click within a cell to edit the port property:
- Zo (ohm) and ZL (ohm) – Specify Impedance values. Accepted syntaxes are:
- real (for example, 50)
- real + imag i (for example, 50+5i)
- imag i (for example, 5i).
- Terminated – Select this check box to terminate a port. Terminated ports are eliminated from the matrix, reducing the matrix size. Existing data sets with mismatching port numbers will no longer be available for data comparisons.
- De-Embedding – This column appears only if gamma values are available. Default units can be changed from the Set Display Format window.
Impedance values are specified in ohms and may be complex, the accepted syntaxes are:
- Real. For example, 50.
- Real + imag i. For example, 50+5i .
- Imag i. For example, 5i .
Explicit units may be used with the impedance value (for example, 0.5kOhm) but will always be shown in ohms (when the dialog box is redisplayed).
Click and dragg a row to reorder ports. To see the port names in the data view displays, use the right-click menu option Full Port Names.
Terminated ports are eliminated from the matrix thereby reducing the matrix size. Existing data sets with mismatching port numbers will no longer be available for data comparisons.
Select Edit > Reset All Port Properties to restore port properties to their load time values.
The de-embedding column only appears if gamma values are available (specifically, if ndExplorer is invoked from the results menu within Twin Builder). Values are always displayed in the units indicated in the column header, however, values may be entered with specific units, such as "1.5in". The default units may be changed via the Set Display Format dialog box (available on the Edit menu or the right-click context menu).
Once the changes have been committed, click OK. Select File > Save As to save the modified matrix values to a file.