
Adding Check Boxes to a Component Dialog Box
Check boxes are control elements that provide a simple either-or input. Using the Component Dialog Wizard, you can add check boxes to provide the following choices regarding model information:
- Toggle display of a model instance's name.
- Toggle display of a non-conservative pin. (Conservative pins are always shown.)
- Select or deselect model outputs.
- Assign a value to a non-conservative input node.
- Define a free value.
An example of a check box as it is appears in the Component Dialog Wizard:

To create a check box for displaying or not displaying a model instance name:
- Select the Controls > CheckBox
from the Component Dialog Wizard
menu bar.
- You can also click Add Checkbox on the Standard toolbar.
- Click the component dialog box to place the check box.
- Drag the check box to its desired location in the component dialog box.
- Resize the check box to its desired height and width.
- Right-click the check box and select Properties.
The Properties
dialog box opens.
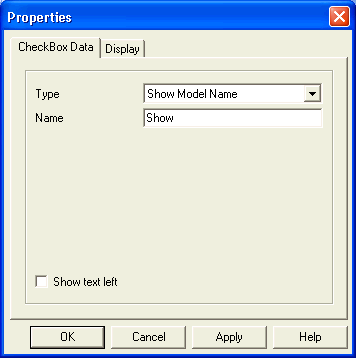
- Select Type > Show Model Name on the CheckBox Data tab
- Type a name for the check box in the Name field.
- Select the Show text left check box to display the name to the left of the check box. If this option is cleared, the name displays to the right of the check box.
- Click OK.
To create a check box for displaying or not displaying a pin:
- Select Controls > CheckBox from the Component Dialog Wizard menu bar.
- You can also click Add CheckBox on the Standard toolbar.
- Click in the component dialog box to place the check box.
- Drag the check box to its desired location in the component dialog box.
- Resize the check box to its desired height and width.
- Right-click the check box and select Properties. The Properties dialog box opens.
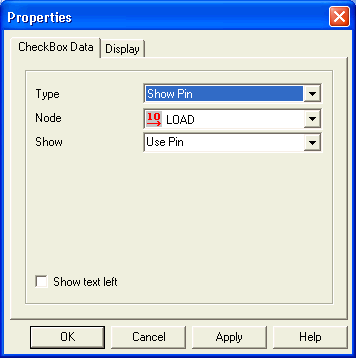
- Select Type > Show Pin on the CheckBox Data tab
- Select the name of the desired node from
the Node list.
Note:
Show Pin applies only to non-conservative nodes. Pins for conservative nodes are always visible.
- Select the manner in which the text accompanying the check box displays in the Show list. There are two choices:
- Use Pin[Node] - A check box appears with the phrase “Use Pin” and the name of the node in brackets [Node Name].
- Use Pin - A check box appears with the phrase “Use Pin” only.
- Select Show text left to display the text to the left of the check box. If cleared, the text displays to the right of check box.
- Click OK.
To create a check box for selecting or deselecting a non-conservative node as a model output:
- Select the Controls > CheckBox from the Component Dialog Wizard menu bar.
- You can also click Add Checkbox on the Standard toolbar.
- Click in the component dialog box to place the check box.
- Drag the check box to its desired location in the component dialog box.
- Resize the check box to its desired height and width.
- Right-click the check box and select Properties. The Properties dialog box opens.
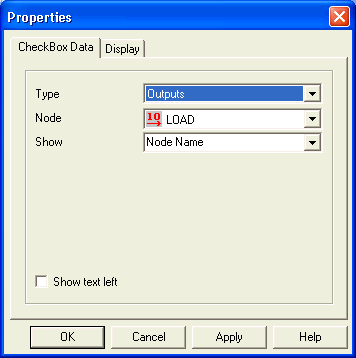
- Select Type > Outputs on the CheckBox Data tab.
- Select the name of the desired node from the Node list.
- Select the manner in which the text accompanying the check box is displayed from the Show list. There are five choices:
- Nodename - The check box appears with the node name only: Node Name.
- Node Name+Unit - The check box appears with node name and expected unit in brackets: Node Name [Unit].
- Output[Node] - The check box appears with the word “Output” and the node name in brackets: Output [Node Name].
- Description - The check box appears with the node description only: Description.
- Description+Unit - The check box appears with the node description and expected unit in brackets: Description [Unit].
- Select Show text left to display the text to the left of the check box. If cleared, the text displays to the right of check box.
- Click OK.
To create a check box for assigning one value or another to a non-conservative input node:
- Select Controls > CheckBox from the Component Dialog Wizard menu bar.
- You can also click Add Checkbox on the Standard toolbar.
- Click in the component dialog box to place the check box.
- Drag the check box to its desired location in the component dialog box.
- Resize the check box to its desired height and width.
- Right-click the check box and select Properties. The Properties dialog box opens.
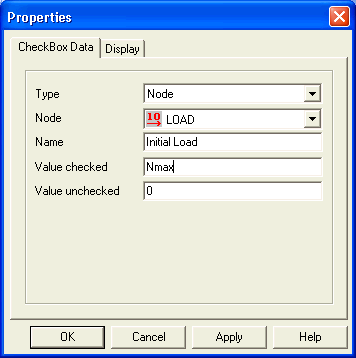
- Select Type > Nodeon the CheckBox Data tab.
- Select the desired node from the Node list.
- Type a name for the check box in the Name field.
- Type a value to be assigned to the non-conservative node when the box is checked into the Value checkedfield.
- Type a value to be assigned to the non-conservative node when the box is not checked into the Value unchecked field.
- Click OK.
To create a check box for assigning one value or another to a free value:
- Select Controls > CheckBox from the Component Dialog Wizard menu bar.
- You can also click Add Checkbox on the Standard toolbar.
- Click in the component dialog box to place the check box.
- Drag the check box to its desired location in the component dialog box.
- Resize the check box to its desired height and width.
- Right-click the check box and select Properties.
The Properties
dialog box opens.
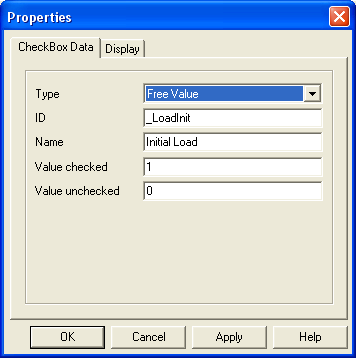
- Select Type > Free Value on the CheckBox Data tab.
- Type a valid node name for the free value
in the ID field.
Note:
Valid node names must start with a letter or underscore, and may contain any combination of uppercase and lowercase letters (A-Z, a-z), the numerals 0 through 9, and underscores.
- Type a name for the check box in the Name field.
- Type a value to be assigned to the free value when the box is checked into the Value checked field.
- Type a value to be assigned to the free value when the box is not checked into the Value unchecked field.
- Click OK.