
Mechanical Getting Started Guides
The following guides are tutorials covering the three solution types available in Mechanical designs (Modal, Thermal, and Structural). These Getting Started guides walk you through the steps to build or import the geometry; apply materials, boundaries, and excitations; set up the solution; run the analysis; and evaluate the results (by generating tables, plots, overlays, and animations):
- Modal Solution – Coil
- Insert a Mechanical design and choose the Modal solution type
- Set 3D UI options and choose the model units
- Import a CAD solid model
- Assign the material
- Apply fixed support boundaries
- Apply length based mesh refinement
- Set up, validate, and analyze the model
- Create a mesh overlay
- Create tables showing modal frequencies, effective mass ratios, and the sum of the effective mass ratios for all translational and rotational directions
- Overlay the displacement magnitude results
- Animate the displacement overlay and review the mode shapes
- Steady-State Thermal Solution – Heat Sink
- Set general options
- Insert a mechanical design and choose the thermal solution type
- Set 3D UI options and choose the model units
- Import a CAD solid model
- Group the transistor components (body, die, and tab)
- Specify the materials
- Imprint the insulator on the heat sink
- Assign contact to the front and back insulator faces (to account for thermal resistance)
- Assign a convection boundary
- Define the ambient temperature
- Assign a heat generation excitation
- Assign length-based mesh refinement
- Draw a series of polyline segments that will be used as a basis of plotting temperature results
- Set up, validate, and solve the thermal analysis
- Create a mesh overlay
- Create a plot of the temperature versus the distance along the previously drawn polyline
- Create a temperature magnitude overlay
- Create a heat flux vector overlay
- Create a fields summary of the heat flow rate of the convection boundaries
- Transient Thermal Solution – Power Resistor
- Open the source project and save it to working folder
- Set 3D UI options (this guide is based on the current view orientation scheme introduced in version 2024 R1, not the legacy orientations of 2023 R2 and earlier versions)
- Modify the material properties (to reduce the transient event duration and solution time, you will decrease the specific heat of all materials by an order of magnitude)
- Assign convection boundaries and define a dataset to vary one of the boundaries with time
- Assign a heat generation excitation, including a dataset to vary it over time
- Define the ambient temperature
- Draw two points and assign each of them as a thermal monitor point
- Assign initial temperatures to selected objects
- Set up the solution, including a dataset to control the rate at which field results are saved
- Validate and solve the transient thermal analysis, monitoring the thermal results as the solution progresses
- Create and animate a temperature overlay
- Create a fields summary of the heat flow rate of the heat generation excitation and convection boundaries
- Structural Solution – Power Resistor
- An Icepak design (specifically, a steady-state thermal analysis) in which the resistor body is a heat source, air movement removes heat, and a fixed temperature is assigned to the face of the solder joints (where they would contact a circuit board trace).
- A Mechanical – Structural design which imports the temperature results from the Icepak design and determines the resultant thermal stresses and displacements.
- Insert an Icepak and a Mechanical design
- Choose the Structural solution type for the Mechanical design
- Set 3D UI options and choose the model units
- Create the power resistor geometry in Mechanical
- Specify component names, materials, and colors
- Copy geometry to Icepak
- Adjust the air region size in Icepak
- Add a void to the air region in Icepak
- Assign flow openings in Icepak
- Assign thermal sources in Icepak
- Solve the Icepak analysis and review the temperature results
- Assign fixed supports in Mechanical
- Assign a non-uniform thermal condition in Mechanical, linking to the Icepak results
- Add mesh refinement in Mechanical
- Solve the Mechanical – Structural analysis
- Compare imported temperatures in Mechanical to Icepak temperature results
- Create and animate a displacement magnitude overlay
- Create an equivalent stress overlay in Mechanical
- Define a clipping plane to see the internal stresses
This Getting Started guide describes how to set up and solve a natural frequency (modal) analysis of a copper coil.
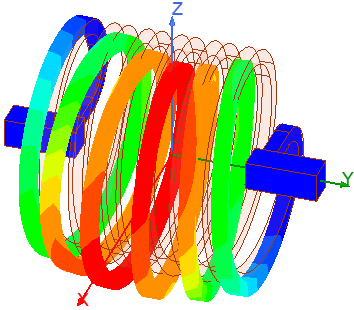
By following the steps in this guide, you will learn how to perform the following modal analysis tasks in Ansys Electronics Desktop:
This Getting Started guide describes how to set up and solve a steady-state thermal analysis of a transistor and heat sink model based on a heat generation excitation and convection boundaries. A thin electrical insulator is used between the transistor and heat sink, and you will define thermal contact resistance between the parts.
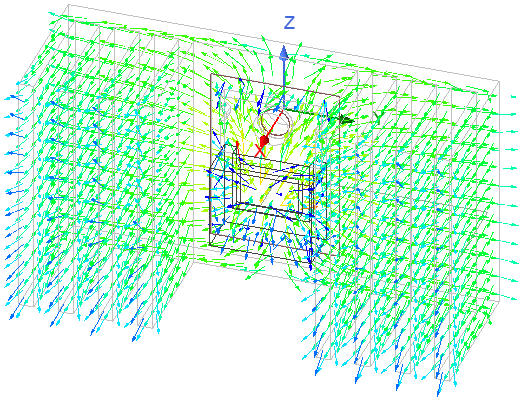
By following the steps in this guide, you will learn how to perform the following thermal analysis tasks in Ansys Electronics Desktop:
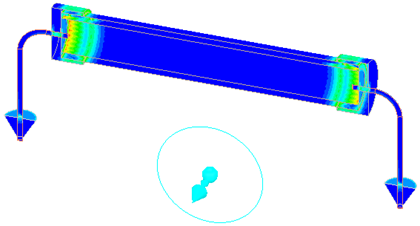
In this Getting Started guide, you will learn how to set up and solve a Transient Thermal analysis of a Mechanical design in the Ansys Electronics Desktop application. You will learn how to use datasets to define time-varying parameters. Specifically, you will use datasets in piecewise constant (pwc) functions to vary heat generation, convection film coeffieient, and the rate at which field results are saved.
The focus is on transient thermal analysis and not solid modeling. Therefore, an Ansys Electronics Desktop project file has been provided as the starting point for the exercise.
![]()
By following the procedures in this guide, you will learn how to perform the following tasks:
This Getting Started guide describes how to construct, set up, and solve two designs with an identical power resistor:
By following the steps in this guide, you will learn how to perform the following thermal analysis tasks in Ansys Electronics Desktop: