
Snapping to a Point
The HFSS modeling UI employs a visual feedback system that allows you to “snap” to a particular location on an object. The cursor changes shape when it is moved over a specific location, thus indicating that any drawing object created will be snapped to that specific location.
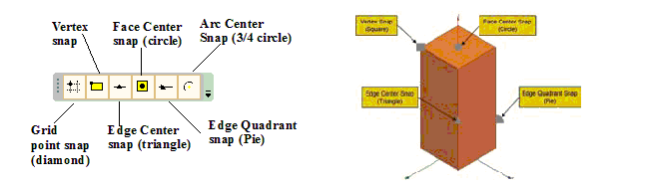
Simple 3D object showing various “snap” locations and the location-specific icon.
By default, the selection point and graphical objects are set to “snap to,” or adhere to, a point on the grid when the cursor hovers over it. The coordinates of this point are used, rather than the exact location of the mouse. The cursor changes to the shape of the snap mode when it is being snapped.
The cursor in the HFSS modeling UI is usually a small diamond. However, the diamond shape changes into a circle, triangle, pie slice, or rectangle, depending on whether the cursor is moved into close proximity with a face center, mid edge, quarter edge, or corner vertex, respectively. Once the cursor has changed shape, a drawing object is “snapped” to the location that corresponds to the cursor shape. For example, if you want to draw a cylinder that is centered on a face of a cube, simply move the cursor over the center of the face until the cursor changes to a circle. Once it has changed shape to a circle, click to set the start location of the cylinder and the cylinder center will be snapped to the center of the cube face.
You can follow the above procedure and snap to any convenient point when creating any model objects.
Snap locations can be activated and deactivated at your discretion. To do this, a user can simply select which snap to have active by selecting the appropriate icon. Alternatively, a user can vary the snap selection by selecting modeler in the tool bar and choosing snap mode.