
Exporting Equivalent Circuit Data in 2D Extractor
You can export distributed or lumped RLGC data from a solution to the following circuit data file formats:
- Berkeley Spice Circuit (*.bsp)
- Cadence DML (*.dml)
- HSPICE Circuit (*.sp) – produces a lumped RLC ladder model at a single frequency.
- IBIS ICM (*.icm)
- Intel LCF (*.lcf)
- Maxwell Spice Circuit (*.spc)
- Nexxim/HSPICE W Element (*.sp)
- Nexxim/HSPICE RLGC W Element (*.sp) – produces a frequency-dependent W element with RLGC, Rs and Gd. Rs and Gd are the high-frequency asymptotes due to skin effect and loss tangent, respectively.


- PSpice Circuit (*.lib)
- Simplorer Netlist Files (*.sml)
- Spectre Circuit (*.ckt)
After importing the new data file to PSpice, HSPICE, or Maxwell Spice, you can include wave effects in circuit simulations.
To export a circuit file:
- Click 2D Extractor > Analysis Setup > Export Circuit.
The Export Circuit window appears.
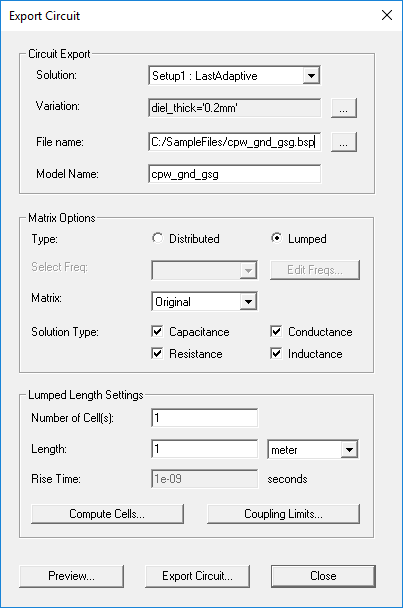
- In the Circuit Export area, set the following:
- Solution – use the drop-down menu to select the solution from which to export data.
- Variation – use the ... button to select a variation from all variations in the design.
- File Name – enter a file path and name for the circuit file to be exported.Note:
To save the circuit in IBIS ICM format, use all lowercase names to facilitate portability between operating systems. The extension should be no more than three characters in length. There is no length restriction on the base file name; however, only lowercase letters, digits 0 through 9, underscore and hyphen are valid characters.
- Model Name – enter a name for the model within the circuit file. Upper and lowercase letters, digits 0 through 9, and underscore are valid characters. Spaces are not accepted. Any invalid characters will be replaced with underscores.
- In the Matrix Options area, set the following:
- Type – select either Distributed or Lumped. Both export types contain nodes for the near and far ends of signal lines, but lumped exports contain nodes for non-ideal grounds only, while distributed exports contain nodes for all ground conductors. See Lumped Circuit Models.
- Select Freq – for discrete or interpolating sweep solutions, use the drop-down menu to select a frequency. This option is unavailable for other solution types.
For interpolating sweeps, you can click Edit Freq to open the Edit Sweep dialog box and enter start and end values.
- Matrix – select either the original solved matrix or any reduced matrices.
- Solution Type – select one or more solution types for export.
- If you chose the Lumped export, in the Lumped Length Settings area, set the following:
- Number of Cells – enter the number of cells (that is, sections) to be used while exporting the circuit. Finer discretization (i.e., a larger number of sections) gives a closer approximation to the underlying Partial Differential Equations. However, this also leads to increased simulation time. You can calculate the number of cell using the Compute Cells option. See the technical notes for Equivalent Circuits.
- Length – specify the length of the transmission line by entering a value and selecting a unit of measure from the drop-down menu. This option is also available for certain distributed exports.
- Rise Time – specify the rise time, in seconds.
- Compute Cells– click to open the Calculate Cells dialog box, which allows you to calculate how many cells to use in a lumped ladder model.
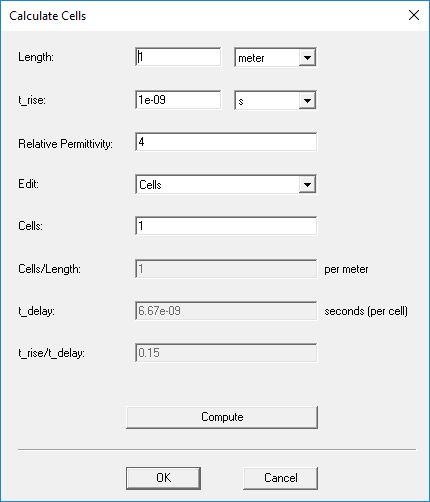
Enter the Length of the transmission line, and select the units. Enter the minimum rise/fall time of the signals on the line in the t_rise box, and select the units. From the Edit drop-down menu, select the quantity you want to edit. Enter the number of cells into which the lumped ladder model will be broken in the Cells box. Enter the number of cells per meter in the Cells/Length box. Enter the delay through a single cell in the t_delay box. This is computed as t_delay = 1/c0 * length/cells; where c0 = speed of light in a vacuum, length = length of the transmission line and cells = number of cells into which the lumped ladder model is broken. Enter the ratio of t_rise to t_delay in the t_rise/t_delay box. This should be 3 or more for good results.
- Coupling Limits – click to open the Coupling Limits dialog box.
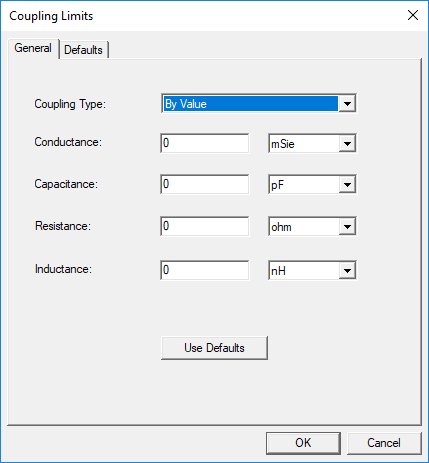
Select a Coupling Type and enter limit values. RLCG values smaller than those specified will be ignored.
- Click Preview to preview the Circuit model.
- Click Export Circuit to complete the export.
- Click Close to exit the window.