
TAU2D: Mesh Density Control Over Selected Objects
Mesh density control is a mesh feature used to control the mesh length on selected objects in the phase of initial mesh generation. When you request a desired mesh length on selected parts of the model, the mesh length over the selected part will not be larger than the requested length.
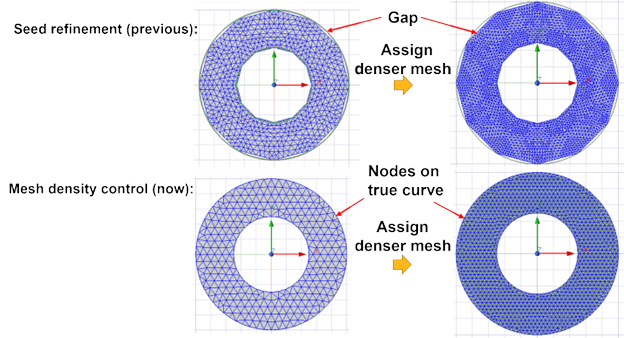
Previously, mesh density was controlled by seed refinement. After the initial mesh is generated, the size of the triangles over the selected body will be refined to meet the specified requirement. However, seed refinement will destroy the cloned mesh pattern generated by the initial mesh. Now, mesh density can be controlled in the phase of initial mesh generation. Combined with clone mesh, mesh density control guarantees that all clone regions have clone mesh pattern. If mesh density is assigned over a body in the primary region, all the clone bodies associated with the selected primary body will have the same density of mesh. It also provides a better geometric approximation of curves.
Mesh density can be controlled at three levels:
-
model level
-
body level
-
edge level
If model level mesh density is specified, mesh over the entire model will be finer than the requested length. If body or edge level mesh density is specified, only the mesh over the selected bodies or edges will be finer than the requested length.
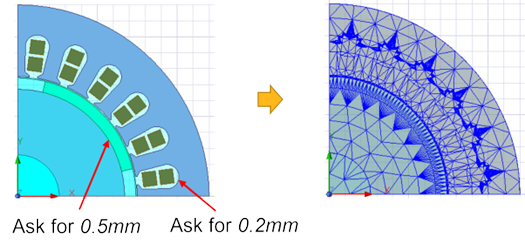
Different mesh densities can be specified over different parts of the model. If multiple mesh densities are requested on the same object, the mesh over the object will be finer than the minimum of all declared lengths. For example, if you request 1 mm of desired mesh length over the entire model and 2 mm of mesh length over a selected object, the generated mesh length over the selected object will be finer than 1 mm. On the other hand, if the user requests 0.5 mm over the object, the generated mesh length over the selected object will be finer than 0.5 mm.
Setting up model level mesh density
-
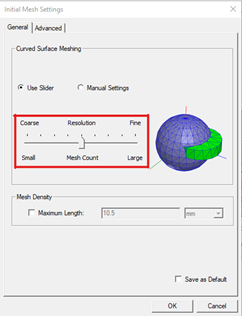
Select Maxwell > Mesh > Initial Mesh Settings... or in the Project tree, right-click on Mesh, and select Initial Mesh Settings from the shortcut menu. Alternatively, on the Simulation tab of the ribbon, select Mesh Settings.
The Initial Mesh Settings dialog box appears with the General tab selected.

-
In the Mesh Density section, enable the Maximum Length check-box, and enter the desired value and unit, which must be greater than zero.
-
Click OK to close the dialog box.
Setting up body level mesh density on selected objects
-
When you open a 2D project, select the body (or multiple bodies) on which you want to apply the mesh density operation.
-
Right-click on the selected object(s) and select Assign Mesh Operation > Inside Selection > Length Based.
The Element Length Based Refinement dialog box opens.
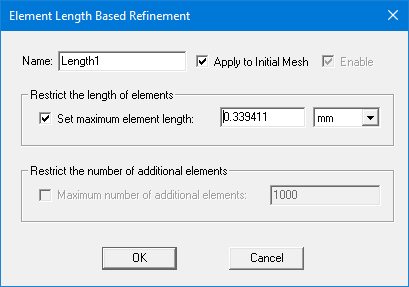
-
Enable the Apply to Initial Mesh check box, then enter the desired value, which must be greater than zero, in the Set maximum element length box, then click OK to close the dialog box.
Note: If Apply to Initial Mesh is checked, input for Maximum number of additional elements will be ignored and grayed out.
Setting up mesh density on selected edges
-
When you open a 2D project, first make sure that Select Mode is set to Edges by right-clicking on the model, and choosing Selection Mode > Edges.
Select the edge (or multiple edges) on which you want to apply the mesh density operation.
-
Right-click on the selected edge(s) and select Assign Mesh Operation > On Selection > Length Based.
The Element Length Based Refinement dialog box opens.
-
Enable the Apply to Initial Mesh check box, then enter the desired value, which must be greater than zero, in the Set maximum element length box, then click OK to close the dialog box.
Note: If Apply to Initial Mesh is checked, input for Maximum number of additional elements will be ignored and grayed out.
The effects of the mesh density control can be seen in mesh plots:
Model Level

Body Level

Edge Level
Related Topics
TAU 2D Mesh Generation for Rotational Models