
Select By Area
You can select items by area in the Modeler window by clicking and rubber-band dragging around objects. Rubber-band selection works differently depending on the drag direction.
-
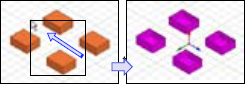
From right to left: Selects all the items that are wholly or partly enclosed within the rubber band.
-
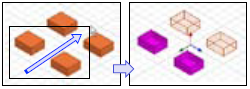
From left to right: Selects all the items wholly enclosed within the rubber band.
Select By Area works with Selection mode for Objects, Faces, Edges, and Vertices, but not for Select Multi. By default, only items with external surfaces are selected.
However you can control which objects to include or exclude from area selection based on material, object names, or object types.
To do this:
-
Click Edit > Select By Area Filter to display this dialog box:
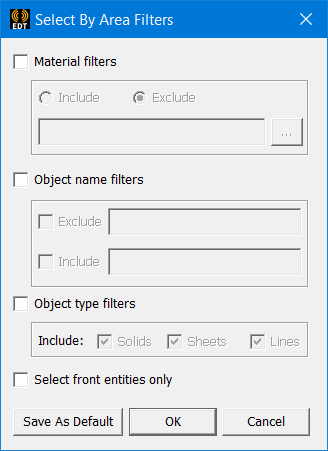
- Check Material filters to enable the Include and Exclude radio buttons. Use the text field to specify filters by name, or use the ellipsis [...] button to display the Materials manager for selections.
- Check Object name filters to enable the Exclude and Include check boxes, and text fields in which you can specify object names.
- Check Object type filters to enable the check boxes for including Solids, Sheets, and/or Lines.
- Check Select front entities only to select only objects that are in front.
- If you click Save As Default, the settings persist for the project until you change the settings and Save as Default again.
- Click OK to close the dialog.
Now, when you left-click and drag around an area, those objects which meet the filter criteria are highlighted in the Modeler window, and those objects are shown as selected in the history tree.
Related Topics
Selecting Items in the Modeler Window