
Modifying the Lighting
You have the option to emit the following types of light on a design:
- Ambient lighting surrounds the model evenly with light. All objects are lit evenly in every direction by a color of light that you specify.
- Distant lighting directs a ray of light at the model in a direction you specify. By default, two distant light vectors are in effect for every new view window.
To modify the lighting:
- Click View > Modify Attributes > Lighting or, on the View tab of the ribbon, click on
Modify Attributes and select Lighting from the drop-down menu.
The Lighting Properties dialog box appears.
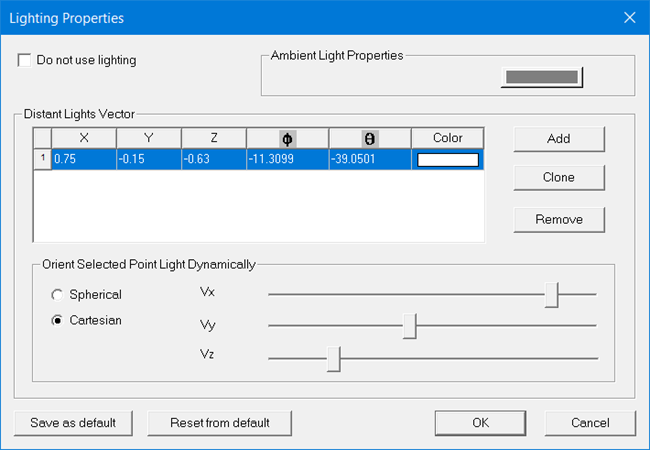
- To turn off ambient and distant lighting, select Do Not Use Lighting.
- To surround the model with light, click the Ambient Light Properties color button and then select a color for the surrounding light from the Color palette.
- To modify the distant light on a model, do one of the following:
- Add a new distant light by clicking Add.
- Copy an existing distant light that you intend to modify by first selecting it in the Distant Light Vectors table and then clicking Clone.
- Select a default distant light to modify by selecting it in the Distant Light Vectors table.
- For the selected distant light vector, specify the vector direction:
- To modify the direction by specifying Cartesian coordinates, do one of the following:
- Enter the new Cartesian coordinates in the X, Y, and Z boxes.
- Use the Vx, Vy, and Vz sliders to specify the Cartesian coordinates dynamically.
- To modify the direction by specifying the spherical coordinates, do one of the following:
- Enter the new spherical coordinates in the Φ (phi) and θ (theta) boxes.
- Use the Φ and θ sliders to specify the spherical coordinates dynamically.
- To modify the direction by specifying Cartesian coordinates, do one of the following:
- To revert to the default ambient and distant light settings, click Reset.
- Click Save As Default if you want the new lighting settings to be the defaults for all 3D Modeler windows, either in the current project or future projects.
-
Click OK to dismiss the dialog box.
The lighting settings are saved with the design.
Note: New lighting applied
to other designs after this point, including new default settings, do
not affect these lighting settings.