
3D Modeler Options: Display
The Tools > Options > 3D Modeler > Display options allow you to change how Electronics Desktop displays your project tree, history, and objects. The Display options settings are in three sub-groups:
- General
- Rendering
- History Tree
General
-
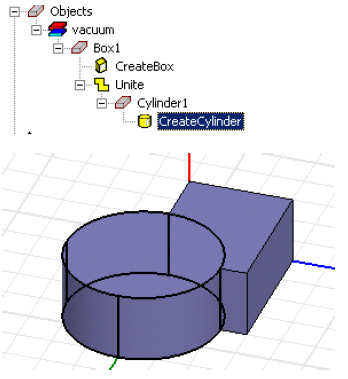
Under Operations History Visualization, select or clear the Visualize history of objects check box.
This option lets you view an outline of each part that comprises an object when the given part is selected in the model history tree. This can help you visualize an object that has been merged with another object. A change to the option takes effect only when you restart Ansys Electronics Desktop. Clearing this selection removes visualization of objects that are part of the model history. For large models, this is faster and uses less memory. The following figure shows an example history tree with an object selected and the outline view of that object in the Main window.
- Select or clear Show coordinate system of selected operations.
- Under Selection:
- Select or clear the Show orientation of selected objects check box.
- Select or clear the Highlight selection dynamically check box. This option causes objects or faces (depending on the selection mode) to be highlighted when you pass the mouse pointer over them. You may want to turn this off for complicated models as it can reduce responsiveness. For large models, the dynamic highlighting option is automatically ignored, and a message is displayed.
- Select or clear Display UV Isolines for wireframe display.
For models with curved faces, you may prefer to clear this selection to simplify the wire-frame display, so the rendering will be faster.
Rendering
- To specify a default color for a Modeler drawing object or action (such as on select):
- Select the object or action from the Default color drop-down menu. Then click the color button to open the Color window.
- Select a color, and click OK.
-
To specify how to render an object, select WireFrame or SmoothShade from the Default view render drop-down menu.
When dealing with complicated geometries, choose WireFrame rendering because it is faster than shaded rendering.
-
To use predefined material appearance if available, check the Use material appearance if available box. When this option is selected, the default color and transparency used for newly created objects come from material settings. It is possible that some materials, like custom materials, may not have a default appearance specified, in which case the default color and transparency specified under Object Appearance are used.
- To set the Default transparency, move the slider or enter a numerical value.
- To set the Default color, click the color button to open the Color window.
- To set the Show Object Outline, use the checkbox. Unchecking shows the objects but without the outline.
- To set the Object Visualization Outline contrast, use the slider. The current value, on a range from 0 to 1, displays in the text field.
History Tree
- Under Default Tree Layout:
- Select or clear the Group objects by material check box. This feature is the same as selecting or clearing the Group Objects By Material toggle command from the Modeler menu.
- Select or clear Group components by definition.
- Under Selection, for the Select last command on object select option:
- If checked, the history tree is expanded after operations on object properties, even if the tree is collapsed for the item.
- If not checked, when you select an object in 3D view, only the object selected, and current tree collapse/expand state is preserved
- Under Selection, for the Expand history tree on object select option:
- If not checked, the history tree does not open on object selection. This can be useful for speeding the display of multiple object selections, or complex objects.
- If checked, selecting an object automatically opens the history tree.