
Prioritizing Objects
You are able to prioritize the objects to ensure that the model is meshed appropriately. The mesh will consider object priority when an object in the model intersects or is contained within another object in the model. The object with a higher priority (higher number) will retain the mesh where it intersects with an object with a lower priority.
The Object Priority dialog box contains two tabs, one displaying the priority list of 3D objects and the other displaying the priority list of 2D objects. The priority of 3D and 2D objects are independent of each other, though by default 2D objects that touch or are embedded inside 3D objects have a higher priority than those 3D objects. Icepak 3D native components that contain both 3D and 2D geometry appear on both tabs. The dialog box has three columns displaying the Priority level, Selections, and Type. Selections is a list of objects or component instances, and the Type is either Object or Component based on the selections.
By default, the Object Priority dialog box displays all objects at the same priority level when first accessing it. Follow the procedure below to reprioritize objects in the model.
Non-model objects are not displayed in the Object Priority dialog box. When a model object is changed to a non-model, the object priority is retained if you changed it back to a model object.
To edit object priority:
- Click Modeler>Object Priority. The Object Priority dialog opens on the 3D tab. The lowest priority assignment appears at the top of the list.
- As needed, select objects in the 3D Modeler window or history tree and click Add Priority List to create a new level of priority to the list. The newly created priority level is the highest.
- Drag the row(s) you want to change to the desired order of priority.
- Add Selections: Adds the object selected in the 3D Modeler window or history tree to the selected priority level.
- Reassign: Reassigns the selected object in the 3D Modeler window or history tree to the selected priority level and moves the existing object(s) as the lowest priority level.
- Delete: Deletes the priority level and moves the existing object(s) as the lowest priority level.
- Select Assignment: Selects the object(s) in the select priority level in the 3D Modeler window and history tree.
- Repeat steps 2 and 3 on the 2D tab.
Alternatively, you can access the Object Priority dialog box by right-clicking Model in the Project Manager and selecting Object Priority.
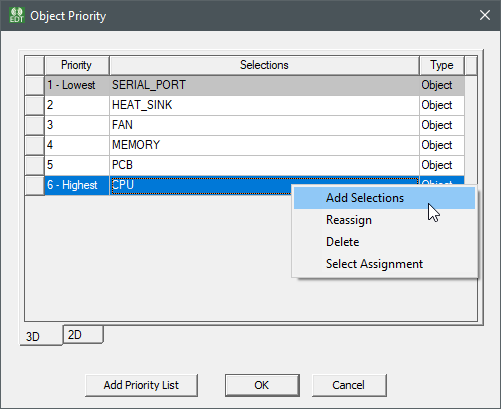
You can right-click in a selection and access the following commands from the menu:
By default, an object contained within another object has a higher priority than the container object. If you specify a higher priority for a container object, a validation error occurs.