Showing and Hiding Boundaries and Excitations in the Active View Window
- On the View menu, click Visibility>
 Active View Visibility.
The Active View Visibility dialog box appears.
- Select the tab for the objects you want to show or hide. The dialog box contains tabs for 3D Modeler objects, Color Key objects, Boundaries, Excitations, and Fields Reporter objects.
- Under the tab you need, select the Visibility option for the objects you want to show in the active view window.
- Click the Boundaries tab if you want to show or hide boundaries.
Note:
Hiding boundaries also turns off a check for boundary overlaps during boundary assignment. In the case of very large models with many boundaries, hiding boundaries can prevent delays during boundary assignment. Full model validation will subsequently check for boundary overlaps.
Click the Excitations tab if you want to show or hide excitations.
- For designs with large numbers of objects, you can resize the dialog for easier selection.
- By default, objects are listed in alphabetical order. You can invert the order by clicking the Name bar above the Name fields. A triangle in the bar indicates the direction of the listing.
- You can also use the Name field to type in an object name and apply the visibility via the Show and Hide buttons.
The objects you select and designate as Visible (by selecting the property or using Show) appear.
- Clear the Visibility selection of boundaries or excitations that
you want to hide from view.
The boundary or excitation will only be visible in the active view window if it is selected.
- Select the Visibility option for boundaries or excitations that
you want to show in the active view window.
The boundary or excitation will be visible in the active view window when it is selected or when it is not selected.
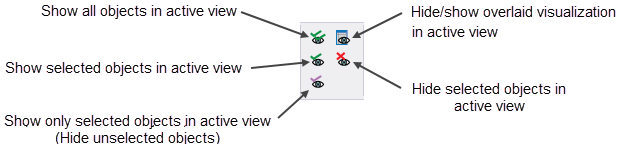
You can also use the show/hide icons on the View, Draw, and Model ribbon tabs: