
Set Differential Pairs
A differential pair represents two circuits, one positive and one negative routed close together so they will pick up nearly the same amount of noise. The two signals are subtracted from each other by a receiver, yielding a near "noise-free" version of the signal.
You can define one or more differential pairs from terminal excitations assigned on existing wave ports. Differential pairs can span ports, use lumped ports, and be enabled or disabled. To allow automated calculation of differential S-parameters from lumped ports, you can select terminals from two arbitrary ports, whether wave ports or lumped ports, for use in a differential pair.
Because differential pairs can span ports or occur within
a port, the Differential Pairs command is accessible at corresponding
levels in the Project tree via the right-click menu both at the Excitations level, and at the port name
level. If a differential pair involves terminals from two different ports,
the Differential Pairs command for those ports can only be accessed
at the Excitations level. If an
individual wave port has multiple terminals defined, the Differential
Pairs command is enabled when you select that port and right-click
to display the shortcut menu. In order to combine differential pairs
across ports, both ports must have the same renormalization setting;
that is, either ports have Do not Renormalize
on, or both have it off. For Transient Network solutions, differential pairs cannot
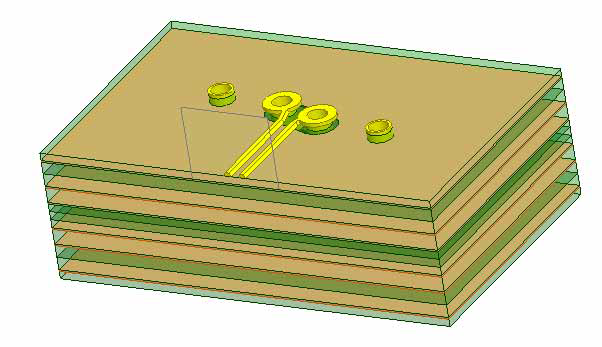
include passive terminals. We will use a differential pair via model
to assign the differential pairs. See Figure below.
Differential Pairs Dialog can be opened from multiple places:
- Network Data Explorer: Edit > Define Differential Pairs
- Ports Folder in a Nexxim Design: right-click Ports > Differential Pairs
- Excitations Folder in a 3D Layout Design: right-click Excitations > Differential Pairs
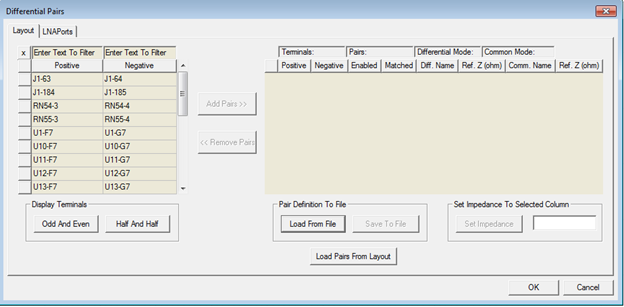
Differential Pairs can be defined for both design layout and LNA setups if both are available. Both pairs will be available in two tabs of the same dialog as shown below.
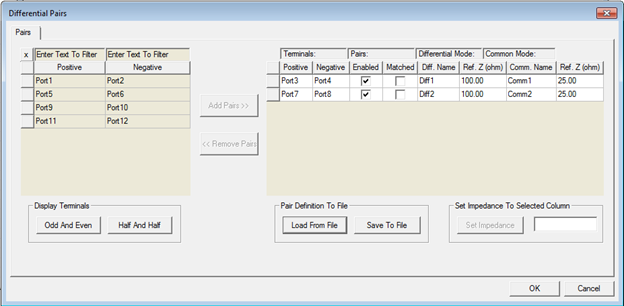
To set up a differential pair:
- All terminals that are not already in pairs are shown in columns Positive and Negative of the Terminals list (on left):
- Clicking on a cell, selects that cell; Multiple selection is allowed using Ctrl+click and Shift+click; if one cell in each column is selected, Add Pairs button is enabled; clicking that button will add the pair to the bottom of the Pairs list (on right)
- Clicking on a row button in Terminals list selects that row; user can select multiple rows using Ctrl+click and Shift+click; when one or more rows are selected, Add Pairs button is enabled; clicking that button will add the pairs to the bottom of the Pairs list
- If anything is selected in Terminals list, accelerator Ctrl+A will select all rows
- Click-dragging a cell in Terminals list to different position in same column or to any position in the other column will move that terminal to the drop position
- Entering text into the first cell in each column will be used to filter which pins are shown in the column; * wildcard character is supported. See the Layout List dialog for an example of this.
- Display Terminals group:
- Clicking Odd and Even will move odd position terminals to Positive column and even position terminals to Negative column; the filters will still be applied
- Clicking Half and Half will move terminals in the first half of the original list to the Positive column and terminals in the second half to the Negative column; filters will still be applied
- Pairs list shows all terminal pairs that have been defined:
- Clicking Enabled or Matched header will toggle the check boxes in those columns; if Matched check box is checked, remove text from both Z Ref cells and disable those cells; if check box is subsequently unchecked restore Z Ref cells to previous values
- Clicking Positive, Negative, or Name column headers will toggle sorting the pairs alphanumerically on that column
- Clicking the Ref Z column headers will select the column
- Clicking on a row button in Pairs list selects that row; user can select multiple rows using Ctrl+click and Shift+click; when one or more rows are selected, Remove Pairs button is enabled; clicking that button will remove the pairs and add the corresponding Terminals back into the Terminals list
- If anything is selected in Pairs list, accelerator Ctrl+A will select all rows; if Del key is clicked, it will remove the selected pairs
- Clicking in a cell for Name or Ref Z will allow user to edit that value directly; names must satisfy pin name restrictions; Ref Z must be positive number with optional resistance units (typing “k” is acceptable for kohm)
- Set impedance group:
- Entering a positive number with option units into the edit box will enable the Set impedance button
- If a Ref Z column is selected in the Pairs dialog box, clicking the Set impedance button will change all values in that column to the value in the edit box
- Pair Definition file group:
- Clicking Save To File button will open Save File dialog with library location buttons; entering a name and clicking Save will save the Pair configuration to that file in csv format; this button is not enabled if there are no pairs defined
- Clicking Load from File button will open Open File dialog with library location buttons; choosing a .txt file will load the previously saved Pair configuration; this will show an error and NOT load if the file syntax is incorrect. Note that the file may contain pair definitions that do not reference pins that exist in the circuit; those definitions won’t be applied. Only definitions where both terminals actually exist will be applied.
- Saving a file and then subsequently loading a file should open a window already showing the last file saved or loaded.
- Load Pairs from Layout button:
- This button will only be shown when the pairs dialog is launched from HFSS 3D Layout; clicking it will load pairs corresponding to Differential Pair net assignments
Scripting for loading/saving differential pairs from/to a file will not be recorded as part of the scripting in the dialog box. The user can hardcode the scripting as follows:
- LoadDiffPairsFromFile(filename)
- SaveDiffPairsToFile(filename)
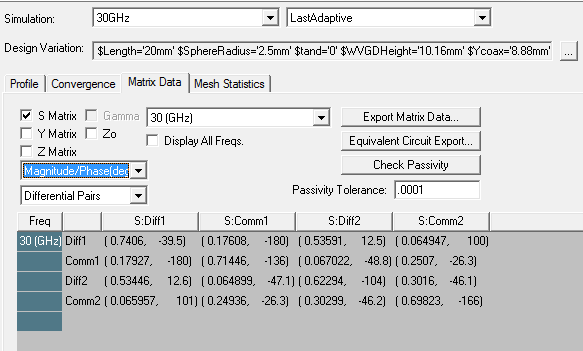
After a solution has been generated, view the common
and differential quantities of the differential pair under the Matrix tab of the Solution
Data window as shown below.
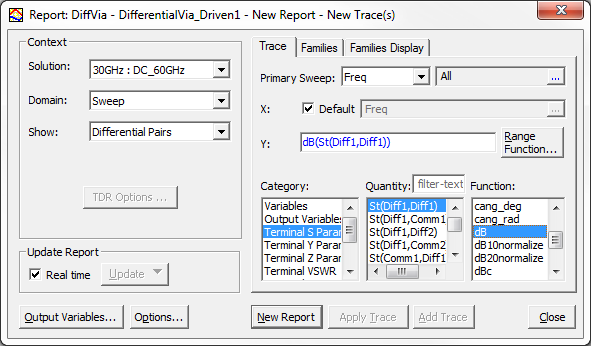
When
the design has differential pairs (link), the reporter can display quantities
for the defined pairs or for the single-ended terminals upon which they
are based. A drop-down menu will appear in the Context
area of the Report creation dialog
which allows the user to select which quantities will be displayed.
You can freely mix differential and single-ended terminal quantities. However, single ended quantities are computed as if no differential pairs existed. So, in the unlikely case of several terminals where only a subset are combined into pairs, the results may not be as expected.