


To display the integration dialog, add an integration node to the Scenery pane and double-click the node.
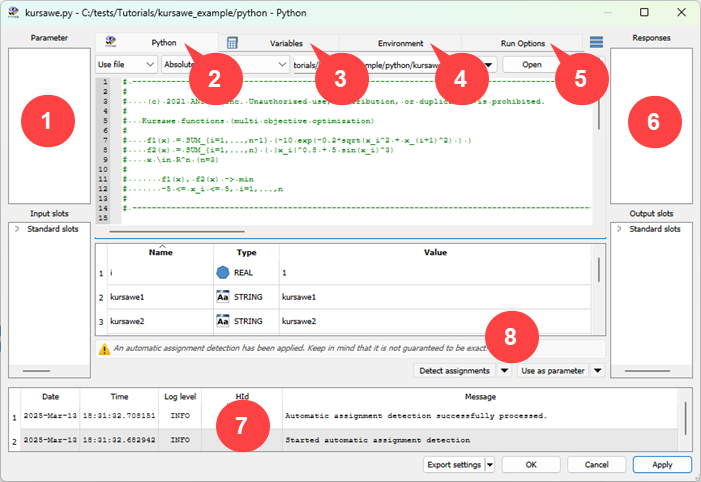
Input
Lists all parameter or input slots. For most integrations, these can be added by dragging from the integration specific pane to the input side and dropping on the Parameter or Input slots pane. Some integration dialogs offer buttons instead. Inputs are classified as design entries. When adding a parameter, the parsed value is used as reference value.
Integration-specific tab
This part of the dialog differs for all integrations. Most integration dialogs consist of a File Browse section to load a corresponding file and an integration specific content pane. This pane is filled with data depending on the file format and the type of integration.
For script and common text based integrations, the integration specific pane is a text editor that displays the content of the file. The context menu of the text editor offers specific features only for script integrations.
Search: The search functionality can be activated using the context menu or the shortcut Ctrl+F. Common search options are available, for example case sensitive, match only a whole word, use regular expressions, forward and backward search.
Font settings: The font of the text window can be changed globally using the context menu. The selected font settings are stored in the configuration file and the font size overrides the application base font size.
For script integrations a list of suggestions (input/output candidates) is displayed.
Drag and Drop: Suggested variables can be dragged and dropped to use as one of the following.
Parameter: Drop on Parameter pane
Input slots: Drop on Input slots pane
Responses: Drop on Responses pane
Output slots: Drop on Output slots pane
Variables: Drag to Variables to switch the center page and drop on the Variables table
For some integrations there are (multi-action) buttons to register/add one of the last mentioned items, as well as Shortcuts and the context menu.
Variables tab
Any location can be registered as (internal) variable. This is helpful when defining derived outputs, for example, a signal created from two vectors. All registered variables are listed in a table with an ID, the value type, the evaluated value, integration specific location information and an expression for derived variables.
Registration of variables can be applied either by drag and drop or by selecting on the multi-action button (if available).
Internal variables can be used to define new derived variables that are needed as output. The Expression cell of a derived variable provides the functionality of the calculator. With the approach of using internal variables and the definition of derived variables directly within the integration, the workaround using slots and calculator to define special responses is unnecessary.
Instant visualization is available for variables and provides special features for array-like variables.
Vector, signal and matrix elements or the x-axis can be dragged from instant visualization panes and dropped either into the variables table or directly into the calculator dialog of an existing variable. The first option automatically creates a new variable, which is initialized with the corresponding expression. An existing expression can be extended using the second option.
Supported types with resulting expressions
by dragging selection from the Data tab:
Vectors: <variable>[<row>]
Signals/xydata: extract(<variable>,<column>)[<row>]
Matrix: extract(<variable>,<row>)[<column>]
by dragging x-axis (also zoomed) from the Visualization tab:
Signals/xydata: window(<variable>,<start>,<end>)
The context menu offers the following options:
: Adds a new entry in the variables tab.
: Removes all selected entries in variables tab.
: Writes the selected variables to the clipboard (all as clipboard format, derived as csv-format)
: Adds the variables contained in the clipboard to
Editor, Excel and so on: derived variables as text (separated with \n for lines and ;; for tokens)
Node of same type: all variables
Node of other type: only derived variables
: Exports entries to the following file formats
optiSLang variable database (*.ovdb): Writes the complete set of variables to the file.
Comma-separated values file (*.csv): Writes only the derived variables to the file.
: Imports entries from the following file formats
optiSLang variable database (*.ovdb): Adds all variables for nodes of same type and only derived variables for nodes of other type.
Comma-separated values file (*.csv): Adds only the derived variables.
: Re-reads the entry values.
: Resizes the view to the current data.
: Opens the calculator editor dialog.
Environment tab
 - Adds an environment
variable to the list.
- Adds an environment
variable to the list. - Removes the selected
environment variable. The override for a default environment variable is
removed or the variable entry is removed entirely if it does not exist
in the default environment.
- Removes the selected
environment variable. The override for a default environment variable is
removed or the variable entry is removed entirely if it does not exist
in the default environment.Default environment - Sets the conditions for the default environment variables.
: Keeps the default environment variables and adds new user-defined variables. In a merged environment the color of the table entries represents whether the variable has its default value (faded text) or has a custom value (normal text).
: Uses only user-defined variables.
Prepend project directory and its bin subdirectory to PATH - When selected, two directories are inserted in front of the PATH variable. For example, if your project path is C:\mypath, the variable PATH will be
PATH = C:\mypath; C:\mypath\bin;
                                C:\Windows
instead ofPATH = C:\Windows
Run Options tab
List of general options for controlling node runtime execution. The number of supported options is individual for each node.
: Configures a delay before a process is started. This delay also works as a minimum delay for multiple parallel process starts.
: If a process takes longer than this number of seconds to execute, the run is counted as failed. The process is terminated automatically if maximum runtime is exceeded.
: Defines the maximum number of parallel runs. This value may be limited in the configuration file by the parameter
IM_DegreeofParallelism.: Defines the number of designs that will be sent to each process at once.
When selected, activates the launch of a single process for multiple designs. The process node creates a file with designs to be calculated and provides the following environment variables for the executing script:
OSL_DESIGNS_BASE: Base directory to the design working directories.OSL_DESIGNS_LIST: File path with the listing of design folders to calculate in the current process call.
If this option is enabled, the environment variables
OSL_DESIGN_NO,OSL_DESIGN_NAME, andOSL_DESIGN_DIRare not available.An example implementation for the script in process node:
REM This is a Windows batch script (*.bat)
copy ..\..\..\py\run_multi_cpfunc.py
python run_multi_cpfunc.py %OSL_DESIGNS_BASE% %OSL_DESIGNS_LIST%
An example code snippet to process the designs:
# This is the Python script "run_multi_cpfunc.py" ... basedir=normpath(sys.argv[1]) # base directory listfile=normpath(sys.argv[2]) # path of the file containing the listing of design folders for folder in listfilereader(listfile): pd=myreader(join(basedir,folder,'inp_cpfunc.txt')) # pd stands for parameter dictionary results={'Y': 0.5*pd['X1']+pd['X2']+0.5*pd['X1']*pd['X2']+5*sin(pd['X3'])+0.2*pd['X4']+0.1*pd['X5']} mywriter(join(basedir,folder,'out_cpfunc.txt'),results) ...: When selected, ignores the process exit code, avoiding problems if the code is not evaluable.
: When selected, interprets the command line or the script as a shell command. When cleared, the process is started at the operating system level.
Note:The option is enabled by default, and is the behavior up to version 7.0.
The redirection of the output to files with the
>operator is only possible with shell execution.If the shell itself causes problems, you should turn this option off.
: Specifies the type of Python environment to use. The default value is optiSLang Python.
You can select different Python environments that are installed on the system, for example, Python 3.5.64 bit or Anaconda 3.5 64 bit.
Additional Python environment can be made available by adding the location to the PATH environment variable or to the optiSLang.ini configuration file.
Python Script node: An executable file (*exe) is required. This node supports both 32 bit and 64 bit Python.
Python node: A 64 bit Python environment is required as only shared libraries (*.dll, *.so) are supported.
optiSLang's Python can be extended with additional packages.
: Select one of the following options:
No auto-save (default)
Actor execution finished
The project, including the database, is auto-saved (depending on defined interval) after calculating this node/system (either when the calculation succeeds or fails).
: When selected, the node does not execute, but forwards outputs (files).
: When selected, creates an extra directory in the design directories for calculations.
: When selected, retries a node execution if it failed. Set the following options:
Number of retries: Maximum number of retry attempts.
Delay between attempts: Time in milliseconds between each retry attempt.
: When selected, forwards the HPC licensing information to the process environment variables.
Note: The process that creates the license context and the process that consumes the license context must use the same license server.
Output
Lists all responses or output slots. For most integrations, these can be added by dragging from the integration specific pane to the output side and dropping on the Response or Output slots pane. All standard slots can be seen when opening the flyout. Manually added slots are displayed directly.
Message log pane
Displays error, information, and warning messages. This pane is only displayed if there are messages to show.
Multi-selection buttons
Allows you to select an action from a list of options, then apply the action by clicking the button.