


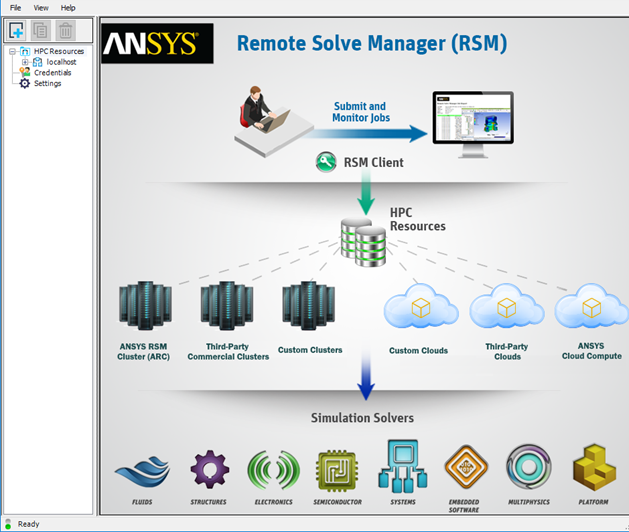
Launch the RSM Configuration application as follows:
If you are using a Windows system, select .
You can also launch the application manually by double-clicking Ans.Rsm.ClusterConfig.exe in the [RSMInstall]\bin directory.
If you are using a Linux system, run the <RSMInstall>/Config/tools/linux/rsmclusterconfig script.
To add a new configuration, click
 .
.On the HPC Resource tab, in the HPC Configuration section, specify information about the HPC resource.
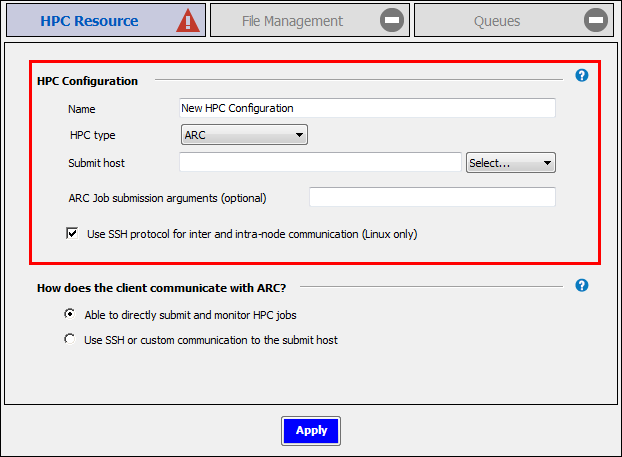
- Name
Type the name that will be used to identify the HPC resource in RSM (for example, Win HPC or Cloud Portal). This name must unique among the configurations in the HPC Resources list in the left pane.
- HPC type
Choose one of the following from the dropdown:
(Ansys RSM Cluster)
Choose this option if you are not integrating with a third-party cluster or Cloud portal.
If is selected as the HPC type, settings become available to specify Parallel Environment (PE) names:
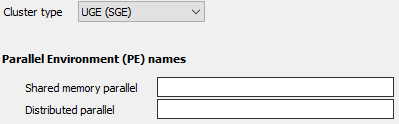
Shared memory parallel processing enables you to distribute solve power over multiple processors on the same machine. Distributed parallel processing enables you to distribute solve power across multiple cores on a single node, or across multiple nodes. For information on configuring parallel environments, consult the documentation of the simulation product you are using.
RSM integrates with Windows HPC, LSF, PBS Pro, TORQUE with Moab and Altair Grid Engine (UGE) without requiring job script customization. For custom cluster types, customization will likely be necessary to make job submission work. Refer to RSM Custom Integration in the RSM User's Guide.
If integrating with a cluster:
- Submit host
Identify the machine that serves as the cluster submit host. This is the machine that handles job scheduling. In other words, it is the machine on which scheduling software is installed, or, in the case of an Ansys RSM Cluster (ARC), the machine on which the ARC Master service has been installed.
If jobs will be submitted to the submit host from any other machine, enter the submit host's full domain name (for example,
machineName.company.com), even if the machine on which you are currently working (the local machine) is the submit host.If the machine on which you are currently working (the local machine) is the submit host, and jobs will not be submitted to it from any other machine, you can enter
localhostin this field.
- Job submission arguments
Specify any scheduler-specific arguments to be added to the job submission command line of the job scheduler. For example, you can enter job submission arguments to specify the queue (LSF, PBS, SGE) or the nodegroup (MS HPC) name. For valid entries, see the documentation for your job scheduler.
- Use SSH protocol for inter and intra-node communication (Linux only)
Specify whether or not you want to use SSH protocol for inter and intra-node communication. This setting is used for distributed computing with multiple nodes involved. It specifies that RSM and solvers use SSH for communications between Linux execution nodes, and within the nodes themselves. If left deselected, this indicates that RSH is used.
This setting will be applied to all Linux cluster nodes, allowing for solvers to run in distributed parallel mode.
When Ansys Fluent, Ansys CFX, Ansys Mechanical, and Ansys Mechanical APDL are configured to send solves to RSM, their solvers will use the same RSH/SSH settings as RSM.
If integrating with a custom cluster or Cloud portal:
- Submit host or URL
If integrating with a custom cluster, enter the domain name of the cluster submit host (for example,
machineName.company.com), then select the platform of this machine in the adjacent dropdown.If integrating with a custom Cloud portal, enter the URL of the resource to which jobs will be submitted, then make any random selection from the platform dropdown. (Since Custom is a general option that can be used for a variety of HPC resource types, a selection must be made in the OS dropdown in order to proceed. In the case of a Cloud portal, the value selected is unimportant and will simply not be used.)
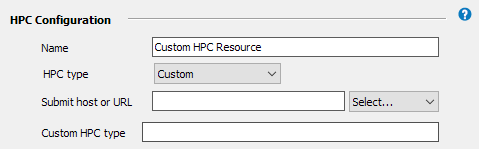
- Custom HPC type
This is a keyword of your choosing that represents the HPC resource. It is a short word or phrase that you will append to the file names of your custom integration files. For more information, see Configuring Custom Client-Side Integration.
Specify how the client will communicate with the HPC resource by selecting one of the following:
- Able to directly submit and monitor HPC jobs
Specifies that the RSM client can use the RSM internal communication mechanism to directly submit jobs to the HPC resource, and monitor HPC jobs. This requires that you open ports and adjust firewall settings on the submit host to allow communication from the RSM client.
When the cluster submit host is a remote machine, the RSM launcher service launches a user proxy process on the submit host which performs operations such as job submission and monitoring on the user's behalf. The RSM launcher service will use one port, while each user proxy process will use a separate port chosen by RSM. Ports for user proxy processes are chosen from a port range if one has been specified in the RSM application settings (see Specifying a Port Range for User Proxy Processes in the RSM User's Guide). Otherwise, RSM will randomly select a port that is free.
- Use SSH or custom communication to the submit host
This option is only available when the submit host is a Linux machine and the RSM client is a Windows machine.
When a job from Windows client is submitted to a remote Linux cluster, this specifies that an external communication mechanism (for example, SSH) will be used to communicate with the submit host instead of RSM's internal communication mechanism. Use this option if you do not want to open ports and adjust firewall settings to allow communication from the RSM client, in adherence with your organization's IT policy.
In the Account name field, specify the account name that the Windows RSM client will use to access the remote Linux submit host.
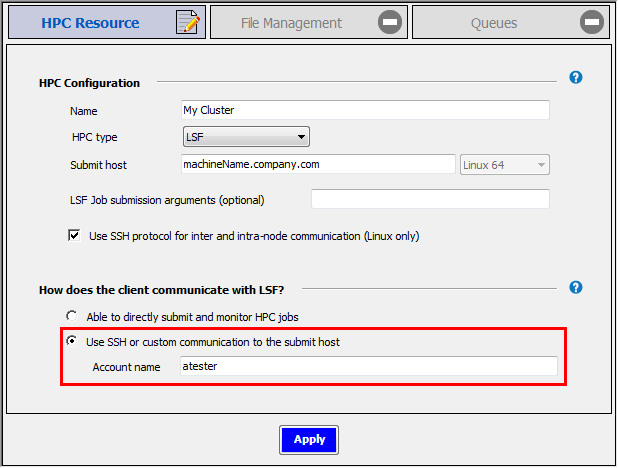
Note: This account must be set up before this mode can be used. For information on configuring SSH to allow access from a Windows machine, see Configuring PuTTY SSH in Setting Up Client-to-HPC Communication and File Transfers.
Click . The icon on the HPC Resource tab changes to a green check mark, indicating that the settings on that tab are complete and valid. Notice that the icon on the File Management tab is now an editing icon, indicating that the settings on that tab should be specified next.

On the File Management tab, in the Client-to-HPC File Management section, specify how client files will get from the client directory to the HPC staging directory. This corresponds to options described in Setting Up Client-to-HPC Communication and File Transfers.
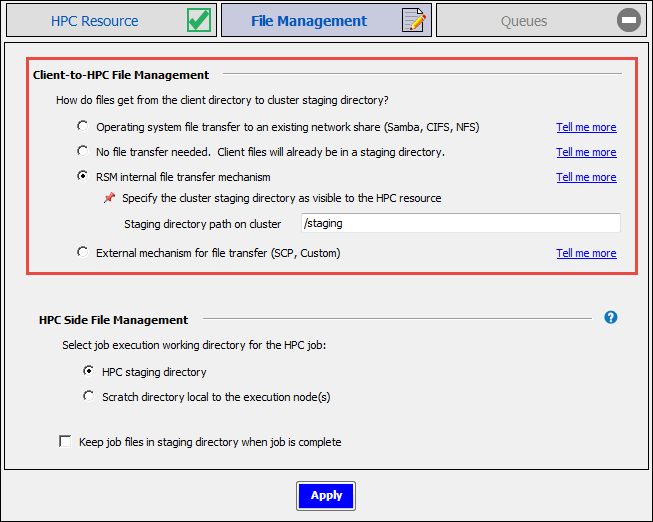
- RSM internal file transfer mechanism
Use this option when the cluster staging directory is in a remote location that is not visible to client machines.
For more information, see RSM Internal File Transfer in Setting Up Client-to-HPC Communication and File Transfers.
- Operating system file transfer to existing network share (Samba, CIFS, NFS)
Use this option when the cluster staging directory is a shared location that client machines can access.
For more information, see OS File Transfer to a Network Share in Setting Up Client-to-HPC Communication and File Transfers.
- External mechanism for file transfer (SCP, Custom)
Use this option when the cluster staging directory is in a remote location that is not visible to client machines, and you are using SSH or a custom mechanism for file transfers.
For more information, see SCP or Custom File Transfer in Setting Up Client-to-HPC Communication and File Transfers.
- No file transfer needed. Client files will already be in a staging directory.
Use this option if the client files are already located in a shared file system that is visible to all cluster nodes.
If the submit host is a Linux machine that is not
localhost, and SSH is not being used, the Network share paths on HPC resource table is displayed. Use the table to specify network paths that map to cluster paths.Client working directories can then reside under each of these mapped directories. On the HPC side, each network share path is the root of the staging directory and must also be visible to all execution nodes.
In all other cases (for example, SSH is being used), you will be prompted to specify the Staging directory path on cluster (or nothing at all).
For more information see No File Transfer in Setting Up Client-to-HPC Communication and File Transfers.
In the HPC Side File Management section, specify the cluster directory in which job (or solver) commands will start running. (This section is available if the HPC type is set to a cluster type, or Custom.)
- HPC staging directory
This option is recommended if one or both of the following is true:
There is a fast network connection between the execution nodes and the cluster staging directory.
You are using a solver that produces fewer, relatively small files as part of the solution and does not make heavy use of local scratch space (for example, the CFX or the Fluent solver).
- Scratch directory local to the execution node
This option is recommended to optimize performance when one or both of the following is true:
There is a slower network connection between the execution nodes and the cluster staging directory.
You are using a solver that produces numerous, relatively large files as part of the solution and makes heavy use of local scratch space (for example, Mechanical solvers).
All input files will be copied from the HPC staging directory into that local scratch directory. Then, when the job finishes running, the requested output files generated by the job will be copied back to the HPC staging directory.
In the Local HPC scratch directory field, enter the local path of a scratch directory on the execution node (for example,
C:\Shares\Local_Share\ScratchDiron Windows). You can enter the path of the scratch directory manually, or use an environment variable in the format %VAR%.If the cluster is running on Windows, you must create a network share path for the local scratch directory on each node. In the Share path for local scratch field, enter the network share path of the local scratch directory. This path starts with a non-editable
[ExecutionNode]variable. When a job is submitted, the[ExecutionNode]variable will be replaced with the actual machine name of each execution node assigned to the job.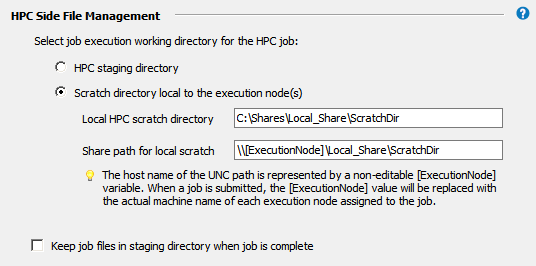
By default, job files will be deleted from the HPC staging directory after the job has run. Choosing Keep job files in staging directory when job is complete may be useful for troubleshooting failed jobs. However, retained job files will consume disk space, and require manual removal.
Click .
On the Queues tab, click
 to import a list of HPC queues:
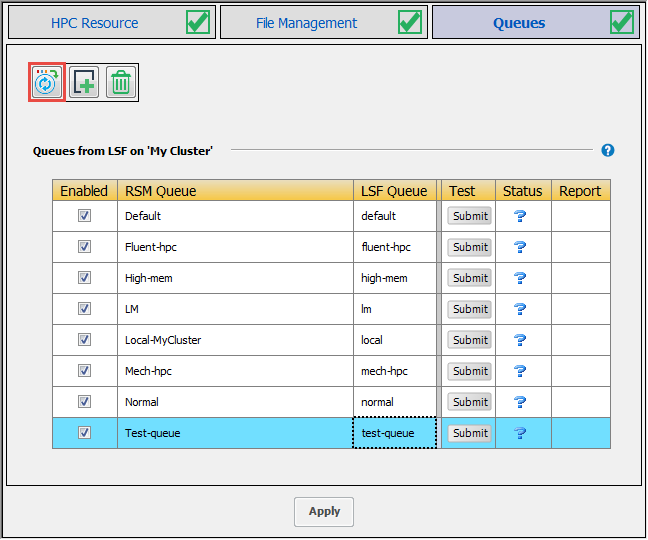
If the credentials needed to access cluster queues have not yet been cached in RSM, you will be prompted to enter them.
Each cluster queue has an RSM queue associated with it. RSM queues are the queues that users will see in client applications when they choose to submit jobs to RSM.
You can also manually add RSM queues to the list and associate existing cluster queues with them.
By default, the RSM Queue name matches the Cluster Queue name.
To edit an RSM Queue name, double-click the name and type the new name. Note that each RSM queue name must be unique.
For each RSM Queue, specify whether or not the queue will be available to users by checking or unchecking the Enabled check box for that queue.
To test a queue, click
 in the queue's Test
column.
in the queue's Test
column.
Note:You may need to click on the Queues tab before being able to submit test jobs.
Only enabled queues can be tested.
The status of the test is displayed in the Status column:

Job is being submitted 
Job is queued 
Job is in progress 
Job completed successfully 
Job completed successfully and released 
Job aborted 
Job aborted and released 
Job failed 
Job failed and released If a test job fails, refer to RSM Troubleshooting in the Remote Solve Manager's User's Guide.
Click to complete the configuration.