To set the advanced controls for the solver, follow the steps below.
Click the Advanced tab in the Solve panel (Figure 36.9: The Solve Panel (Advanced Tab))
Specify the computer on which you want the solution to run. There are four options:
This computer runs the solution on the computer you are currently using.
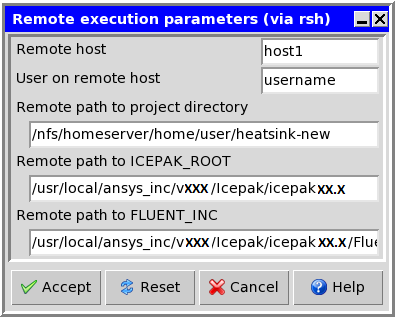
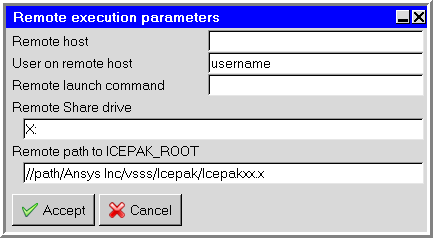
Another computer runs the solution on another computer on your network. To specify parameters related to the remote execution, click Edit parameters next to Another computer. This will open the Remote execution parameters panel (Figure 36.11: The Remote execution parameters Pane (Linux) and Figure 36.12: The Remote execution parameters Panel (Windows)).
Specify the name of the host computer to which the project is to be submitted next to Remote host.
Specify the user account name on the remote computer next to User on remote host. By default, this is the same as the user account you used to log onto the machine on which you are currently running Ansys Icepak.
In the Remote launch command field, enter the protocol: rsh, ssh, or plink.
(Linux machines only) Specify the Remote path to project directory, which is the project directory on the remote computer. The default is the project directory path on the current machine.
(Windows machines only) Specify the Remote Share drive by entering a drive letter followed by a colon (for example,
X:). this is the shared drive that will be used to mount the project directory on the remote computer. The drive letter that you enter must not be previously mapped on the remote computer.Specify the Remote path to ICEPAK_ROOT, which tells the remote computer the location where Ansys Icepak is installed on the local computer. For example, if Ansys Icepak 2024 R2 has been installed under
/usr/localon a local Linux machine, there will be anansys_incdirectory present as/usr/local/ansys_inc. You would then need to set yourPATHenvironment variable to include/usr/local/ansys_inc/bin.On a Windows machine, follow the steps given on the Ansys customer site under the search term “Running Icepak Network Parallel”.
In the Remote execution parameters panel, you must then specify the full network path to the local installation of Ansys Icepak unless the local path has been mapped as a network drive on the remote machine or Ansys Icepak has been installed on the remote machine. In either of these exceptions, you can specify an appropriate drive letter as a part of the path.
(Linux machines only) Specify the Remote path to FLUENT_INC, which is the location where Ansys Icepak’s version of the Fluent solver was installed (that is, ICEPAK_ROOT
/Fluent.Inc).Click Accept to accept any changes made to the panel and close the panel.
You can click Reset to undo all the changes made in the panel and restore all items to their original states when the panel was opened, or click Cancel to close the panel and ignore any changes made to the panel.
Batch queue uses a file which specifies inputs and outputs. An example of batch processing on a Windows machine is described in Batch Processing of Ansys Icepak Projects on a Windows Machine.
Script file specifies that the commands necessary to run the solution are to be output to a script file. The commands in the script file can be used to run the solution on the computer you are currently using or on a remote computer. The default name for the script file is
ident.SCRIPT, whereidentis the identifier specified in the Solution ID field. This option can also be used to batch process a number of Ansys Icepak projects.You can run Ansys Icepak under LSF by selecting Use LSF under the Script file option. Platform Computing’s LSF software is a distributed computing resource management tool that you can use with either the serial or the parallel version of Ansys Icepak. Contact Platform directly for support of their product.
Note: Running Ansys Icepak under LSF is not supported on Windows.
The requirements are as follows:
LSF 6.0 - 7.0, available from Platform Computing at http://www.platform.com
Ansys Icepak 16.0 and above
The LSF components are included in all versions of LSF packages that are able to be downloaded from the Platform ftp site (
ftp.platform.com). If you are a current LSF customer, contact Platform support personnel for downloading instructions atsupport@platform.com. New LSF customers should contact the Platform sales department.
Enable the appropriate advanced solution control options. The following options are available in the Advanced tab of the Solve panel (Figure 36.9: The Solve Panel (Advanced Tab)):
Reuse existing solver input files enables the use of a pre-existing case file and script file. This is typically used if you want to continue from a previous solution, without changing any parameters in the problem.
Reuse existing meshes allows you to use an existing mesh to avoid regenerating the mesh when there were no changes to the model geometry.
Don't start solver allows you to set up the solver parameters without actually running the solver.
Merge zones when possible instructs Ansys Icepak to optimize the solver by merging zones whenever possible before writing the model information to a Fluent case file. This option is enabled for all objects by default. You can click to open the Object zone merging panel and enter
1for objects you don't want to merge.Merge NC interfaces when possible instructs Ansys Icepak to optimize the solver by merging the non-conformal interfaces whenever possible before writing the model information to a Fluent case file.
Start monitor instructs Ansys Icepak to display the convergence history for the calculation while the calculation is in progress. See Defining Solution Monitors for details on enabling the display of solution residuals and point monitors.
Show diagnostic output from solver prints the numeric values of the residuals to a separate window.