Graphics window displays can be saved as image files in various formats, including PNG, TIFF, GIF (8 bit color), and PostScript. There may be slight differences, however, between images and the view displayed in the graphics window, since images are generated using the internal software renderer, while the graphics window may utilize specialized graphics hardware for optimum performance.
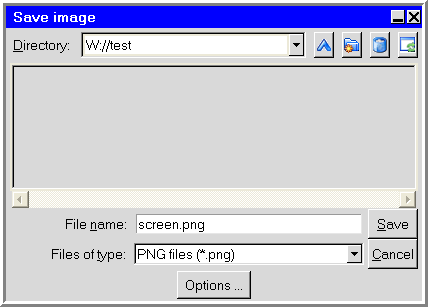
To set image parameters and save image files, you will use the Save image panel (Figure 5.5: The Save image Panel). To open the Save image panel, select Create image file in the File menu. This allows you to generate a file or a printed copy of your model as shown in the graphics window or in a selected region of the graphics window. Note that you can also add annotations to your image file (see Adding Annotations to the Graphics Window).
The procedure for saving an image file is as follows:
Specify the name for the image file to be saved. Ansys Icepak will assign a default prefix for the filename, which is shown in the Files of type drop-down list. You can enter your own filename, which can be a full pathname to the file (beginning with a / character on a Linux system or a drive letter on Windows) or a pathname relative to the directory in which Ansys Icepak was started.
Select the image format. See Choosing the Image File Format for details.
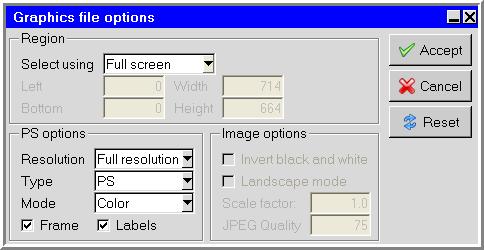
Click Options... to open the Graphics file options panel (Figure 5.6: The Graphics file options Panel).
Under Region, specify the desired selection method (Fullscreen, Mouse selection, or Pixel location) in the Select using drop-down list. If you select Pixel location, specify the region in the Left, Bottom, Width and Height fields. See Specifying the Print Region for more details.
Under Image options, use the Invert black and white option to control the foreground/background color. If this option is selected, the black and white colors of the graphics window being rendered into hard copy will be swapped. This feature allows you to make images with a white background and black foreground, while the graphics window is displayed with a black background and white foreground.
If you are saving a PostScript file, set the appropriate PS options. See Setting Options for PostScript Files for details.
Under Image options, use the Landscape mode option to specify the orientation of the image. If this option is turned on, the image is made in landscape mode; otherwise it is made in portrait mode.
Under Image options, specify a scale factor by entering a value in the Scale factor text entry box. The image in the image file will be scaled relative to its actual size in the graphics window. The scaling factor must be a real number greater than zero. Values greater than 1 will increase the size, while values less than 1 will decrease the size.
Click to close the Graphics file options panel.
Click to save the image file (or click Cancel to close the Save image panel without saving the image file).